This tutorial was supposed to be out like 4 months ago but I unfortunately never had the time to finalize it until now.
I’ve been casually texture modding games for many years and this type of thorough tutorial was something I had planned during UE3. I never got around to it because I got into texture modding BnS very late into the UE3 lifespan and figured it would be obsolete in less than a year but now with UE4 fresh, this tutorial will actually be relevant for a bit, so I hope it will help others understand how to start texture modding the game and also give you all the tools you need.
While this tutorial uses tools meant to work with the NA/EU region, some of the knowledge can transfer over to other regions and game assets to edit may be in the same paks.
Tools Needed
Everything is free, except for Photoshop if you choose to use this program to edit textures.
- Photoshop, Gimp, or other image editing software but I highly recommend using one that supports Alpha Channels. Clip Studio doesn’t support Alpha Channels but can be used if you rebuild the Alpha Channel in another program or if your texture simply doesn’t use Alphas.
- KimCoder’s Bns UE4 ModTool for unpacking and repacking.https://www.bnsbuddy.com/threads/bns-ue4-modtool.2651/
- UE Viewer - https://www.gildor.org/en/projects/umodel
- Unreal Editor Ver 4.25.4 and pick the creator’s license one - https://www.unrealengine.com/en-US/download
- Notepad++ - https://notepad-plus-plus.org/downloads/
- Pak File List in xml format from the Mod Police Discord. https://mega.nz/file/8J8U1QbI#VmueJ9N1aTNH4KTSbOczZrim3h5JBxRdU-SecRjlHx4
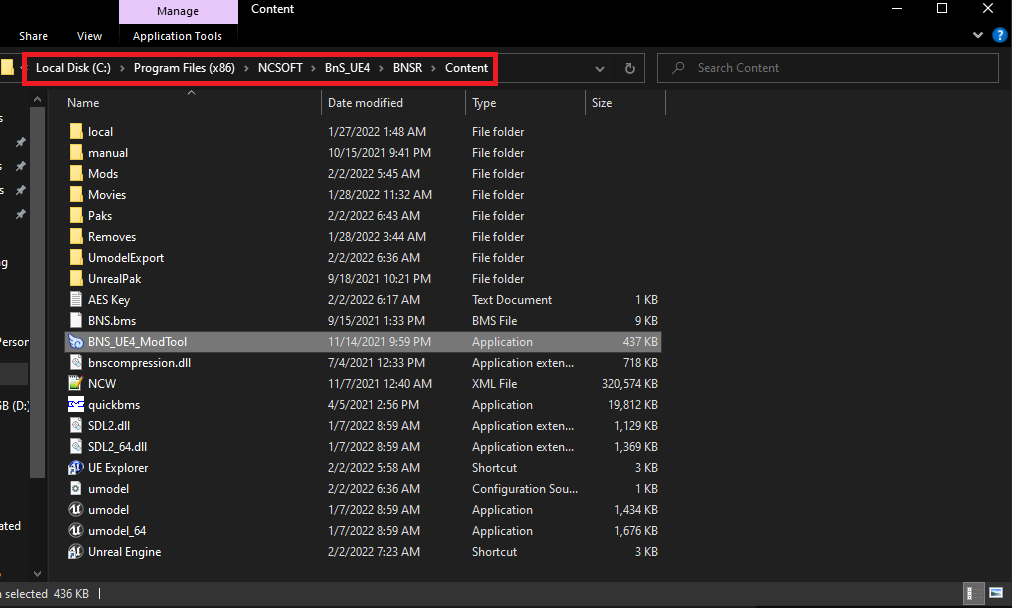
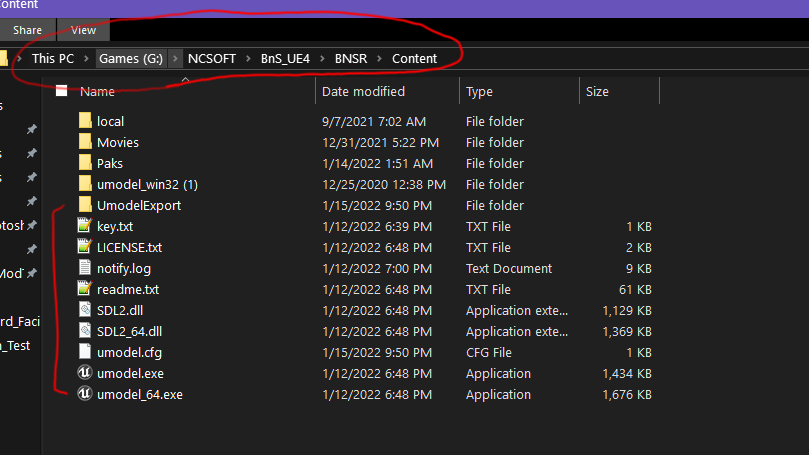
Probably the biggest pain in the ass aside from actually working on your textures. You will use UE Viewer for this. I personally put the entirety of the Viewer inside the game’s folder in BNSR, then Content. That way, I don’t have to search for the game and it opens all the paks by default.

You will need the BnS AES key, which is 0xD2E5F7F94E625EFE2726B5360C1039CE7CB9ABB760A94F37BB15A6DC08741656
This key works as of the day this tutorial was made. I have the key saved to a text document where UE Viewer is located.
There are two ways to find the files you need from what I know. From easiest to hardest.
- If you have old mods from UE3 or your old UE3 installation still around, open the UPK(s) with the UEViewer and look for the “core” number or name of the texture you will be using. The Object line in UE Viewer contains the core number or name you can search in Pak File List. Screenshots of the files you used before that contain the Object or Core are also good.
- Find them manually in the UEViewer. I’m fortunate enough to just be working with old mods from UE3 for now. You will have to look through all textures and know which one it is that you need. The Object line in UE Viewer will contain the core number or text you can search in the Pak File List.
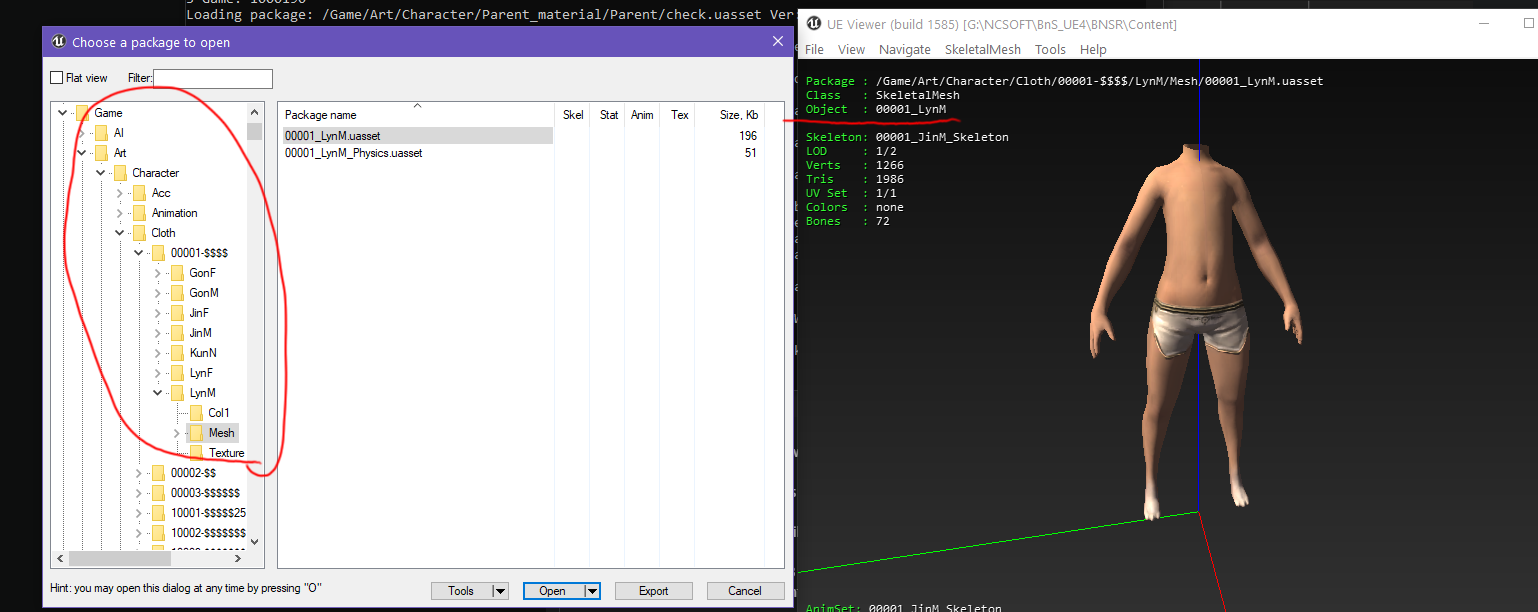
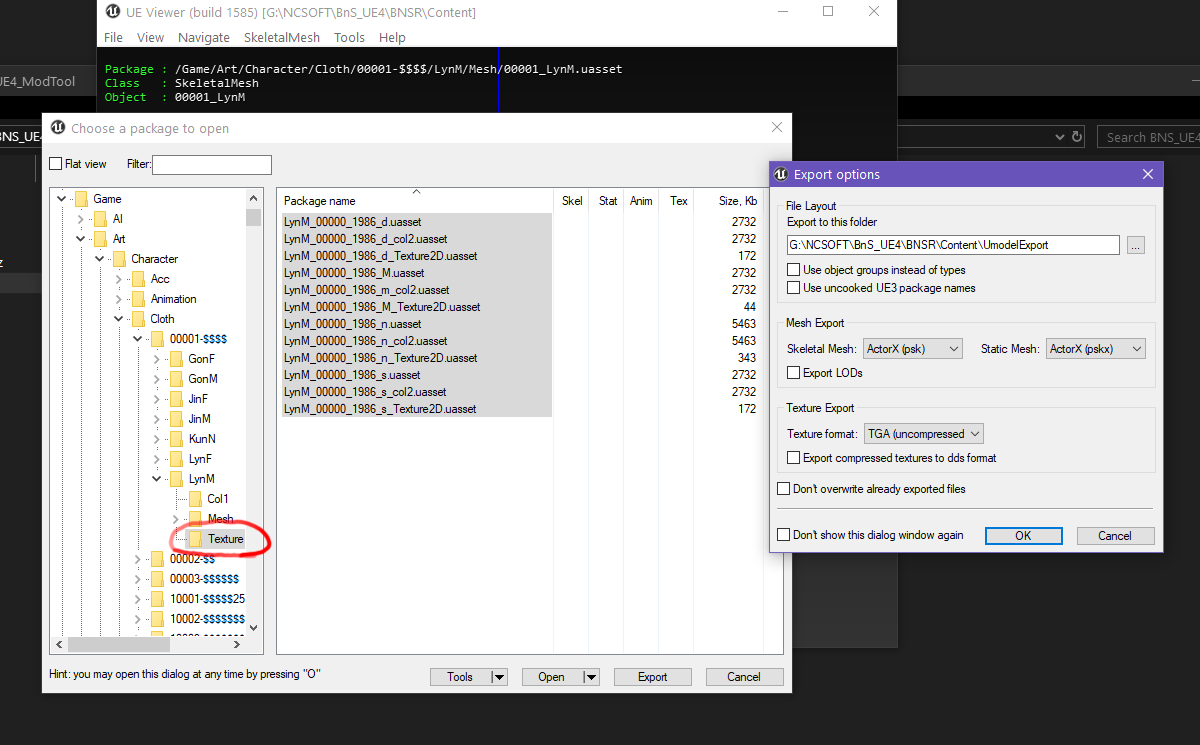
- Textures will be located in Game > Art > Character inside the UE Viewer. There are different folders, such as Cloth (outfits) or Face (stuff like makeup, eyelashes…) and you can also find the mesh somewhere in there.
Here is an example of the Object number you will need and where the textures are located in UE Viewer.
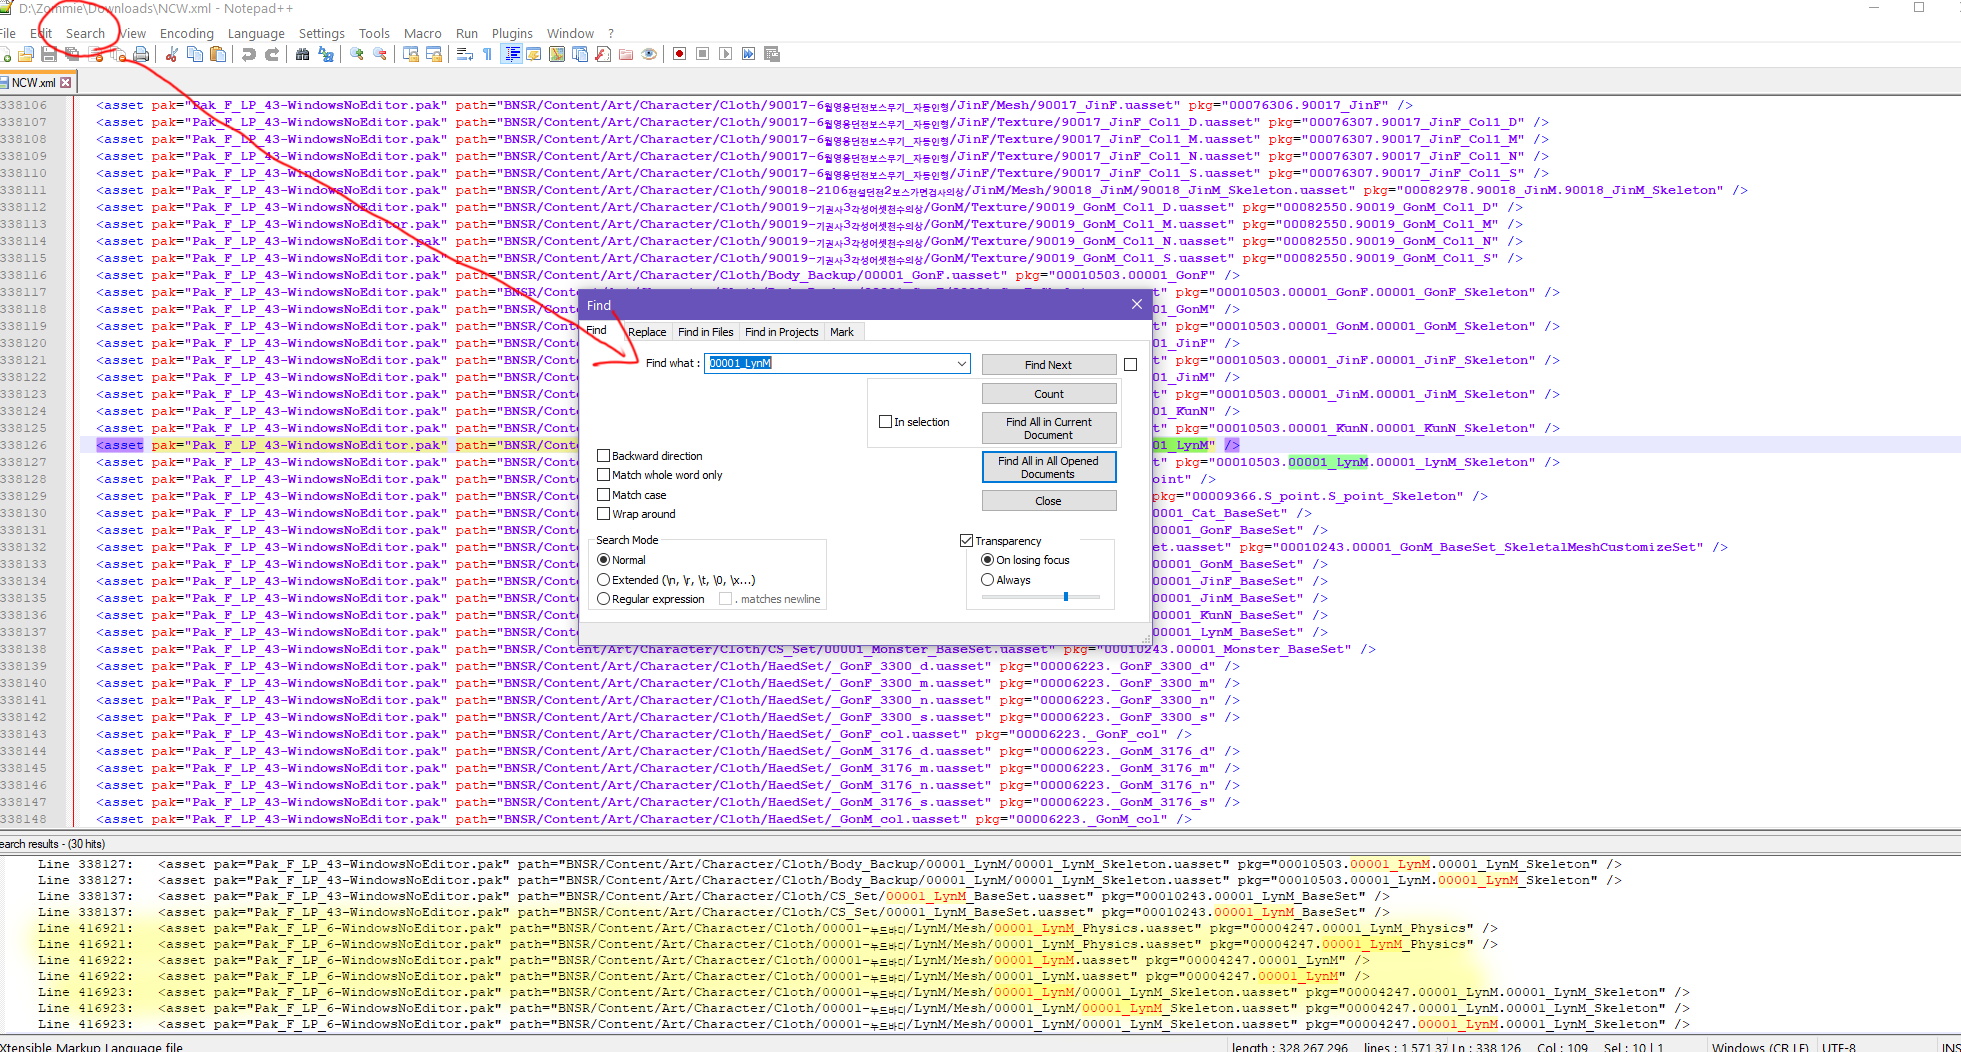
Next, open the Pak File List xml in Notepad++. And now it’s time to Search the core number or text found in the Object line of the texture or mesh you are trying to edit within the game’s new paks system. Use Find All in Current Document.
Note: If you get errors opening files with Notepad++, make sure you did download the correct version for your operating system.
You can see here that Pak6 contains the texture because it has the Cloth path in the entire line and has things like the Physics. You can ignore the search result with "CS_Set".
Copy and paste the entire line starting with "Pak_F...etc" somewhere or keep your Pak File List opened. You will need this exact folder path line later on in the tutorial.
You will need the BnS AES key, which is 0xD2E5F7F94E625EFE2726B5360C1039CE7CB9ABB760A94F37BB15A6DC08741656
This key works as of the day this tutorial was made. I have the key saved to a text document where UE Viewer is located.
There are two ways to find the files you need from what I know. From easiest to hardest.
- If you have old mods from UE3 or your old UE3 installation still around, open the UPK(s) with the UEViewer and look for the “core” number or name of the texture you will be using. The Object line in UE Viewer contains the core number or name you can search in Pak File List. Screenshots of the files you used before that contain the Object or Core are also good.
- Find them manually in the UEViewer. I’m fortunate enough to just be working with old mods from UE3 for now. You will have to look through all textures and know which one it is that you need. The Object line in UE Viewer will contain the core number or text you can search in the Pak File List.
- Textures will be located in Game > Art > Character inside the UE Viewer. There are different folders, such as Cloth (outfits) or Face (stuff like makeup, eyelashes…) and you can also find the mesh somewhere in there.
Here is an example of the Object number you will need and where the textures are located in UE Viewer.
Next, open the Pak File List xml in Notepad++. And now it’s time to Search the core number or text found in the Object line of the texture or mesh you are trying to edit within the game’s new paks system. Use Find All in Current Document.
Note: If you get errors opening files with Notepad++, make sure you did download the correct version for your operating system.
You can see here that Pak6 contains the texture because it has the Cloth path in the entire line and has things like the Physics. You can ignore the search result with "CS_Set".
Copy and paste the entire line starting with "Pak_F...etc" somewhere or keep your Pak File List opened. You will need this exact folder path line later on in the tutorial.
Optional Step
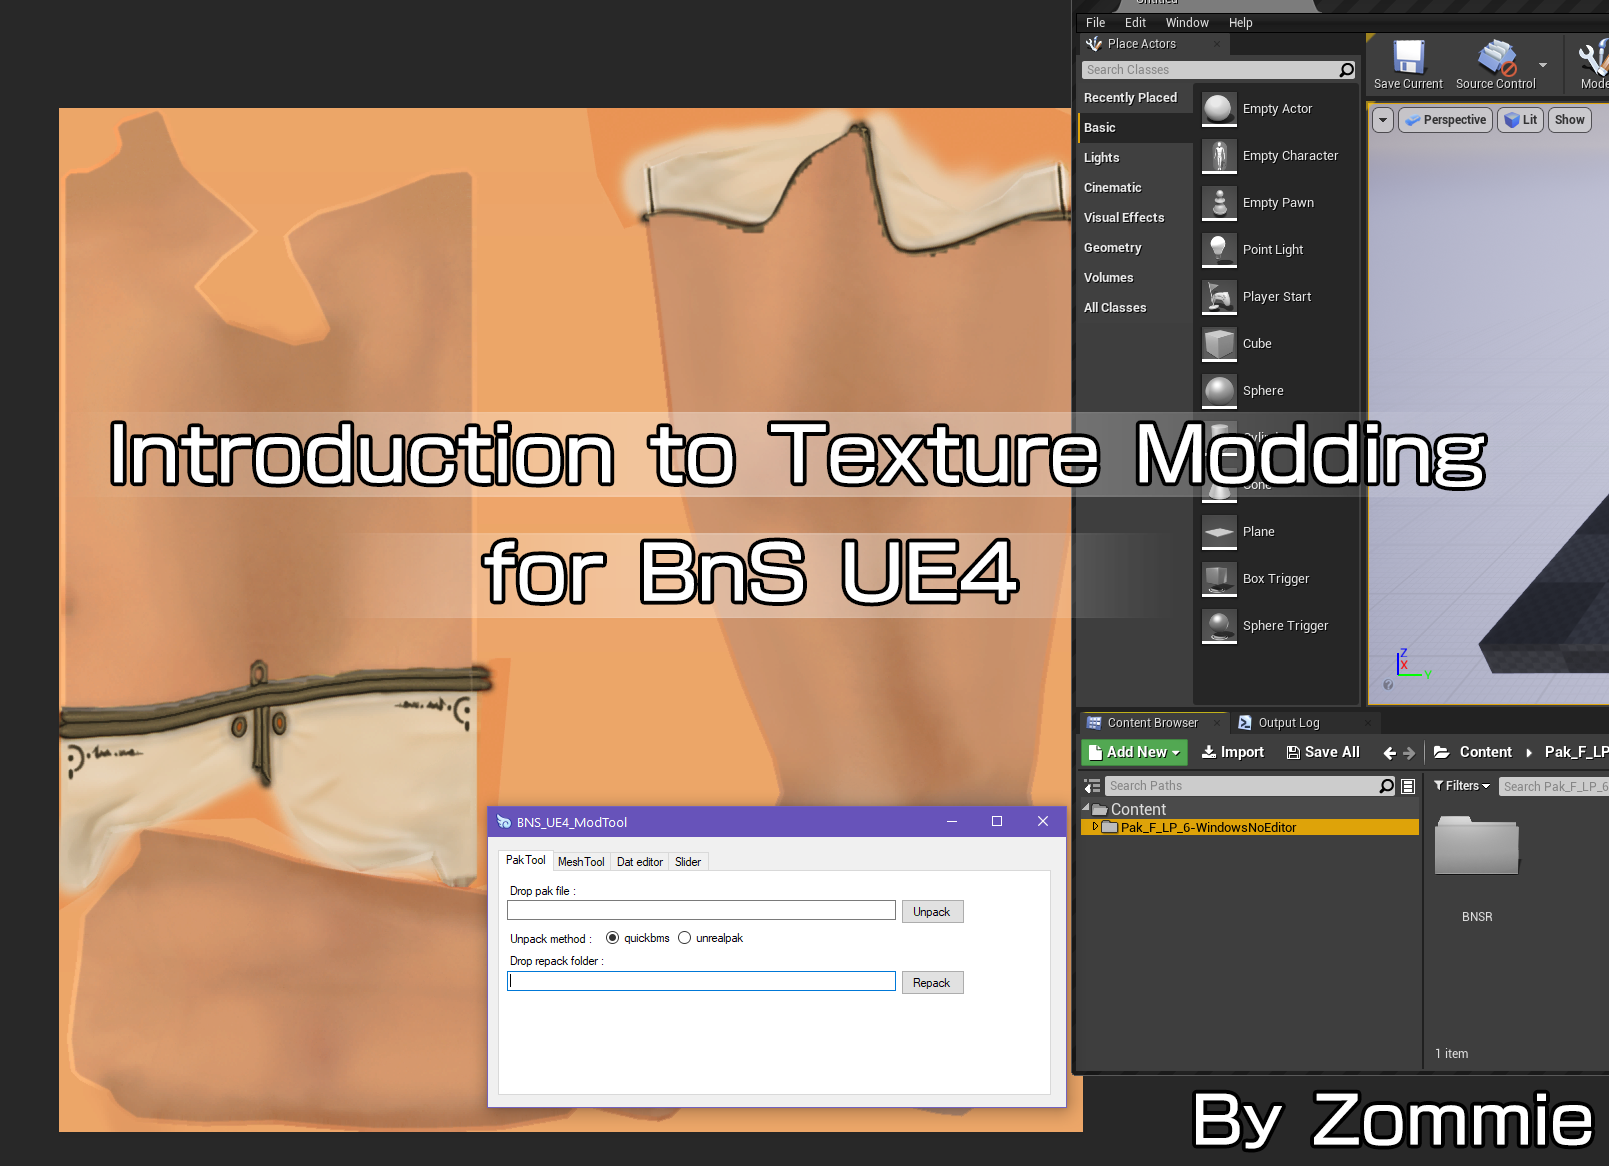
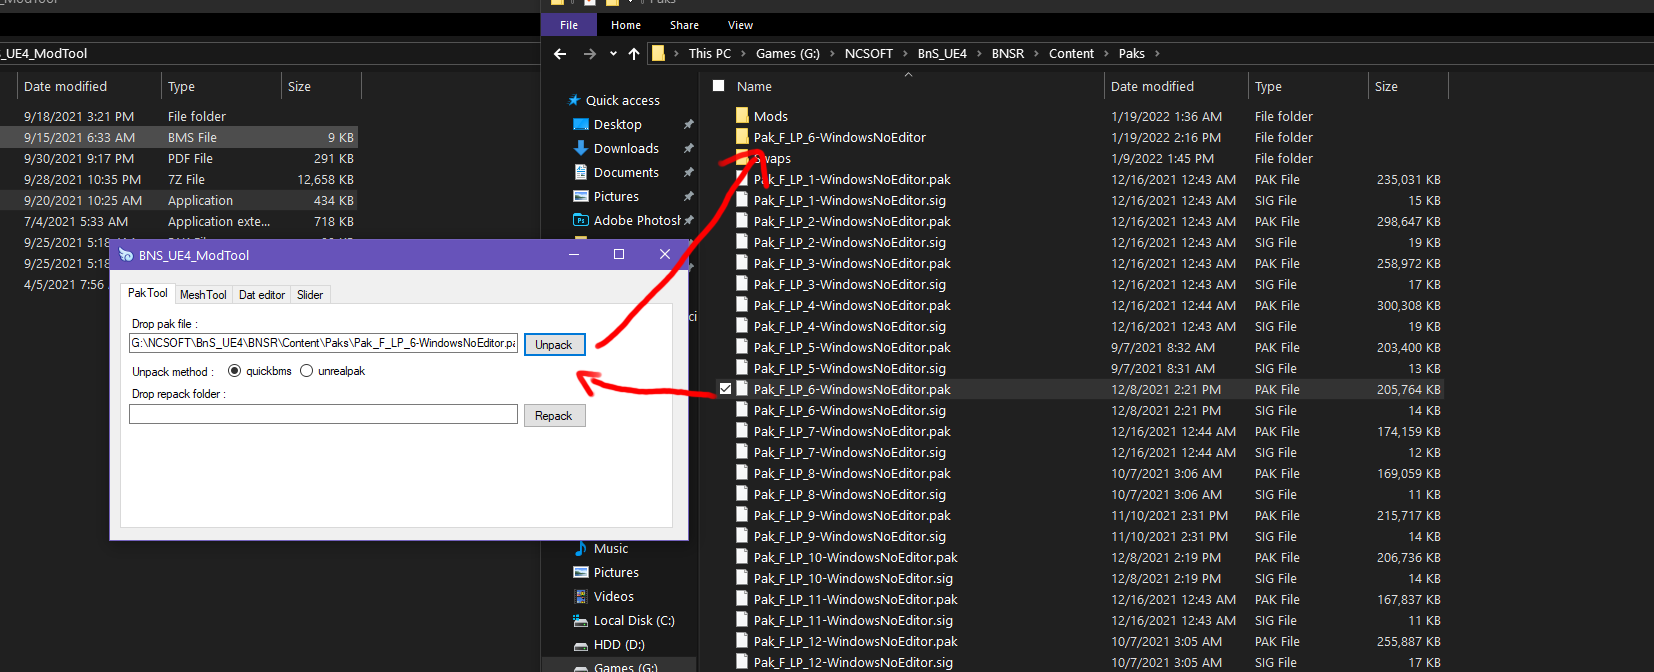
This step is mainly if your texture is NOT found in the Pak File List due to it being a new outfit. If you know which Pak it's contained in, extract it because you will need the exact folder path name that is found within the game's files for later. For here, we will extract Pak6 as an example. You just drag and drop it onto the ModTool. The tool will give you the folder inside your Paks. I recommend clearing the main Pak folder out of any extracted paks asap, as having too many in there has caused crashes for me in UE Viewer when I was trying to extract assets.
Go back to UE Viewer and export your texture. It can be exported as a TGA (uncompressed) or a DDS (sometimes a texture may bug out as a TGA; you will know because there are black dots everywhere). There will be a UModelExport folder wherever you put your UEViewer. In my case, it’s within the game’s folder itself.
Make a backup of your texture if you want. Open your texture in your image editing program and what you do here is dependent on your skill level as a texture modder.
Save it as a TGA, even if you exported as a DDS, and keep the exact same name. The reason why I’m saving as TGA for this tutorial and not DDS is because Unreal Editor throws out an error (for me personally) when trying to import DDS files from UE Viewer or even those saved in Photoshop. I was not able to proceed with texture modding by using DDS because of this. TGA files are compatible with Unreal Editor and they are saved in the DDS format through there anyways once baked. The default option in Unreal Editor will work for BnS for the types of textures I’m doing, which are mostly recolors or minor edits.
This is it for saving the texture part. Now we can set up Unreal Editor
This step is mainly if your texture is NOT found in the Pak File List due to it being a new outfit. If you know which Pak it's contained in, extract it because you will need the exact folder path name that is found within the game's files for later. For here, we will extract Pak6 as an example. You just drag and drop it onto the ModTool. The tool will give you the folder inside your Paks. I recommend clearing the main Pak folder out of any extracted paks asap, as having too many in there has caused crashes for me in UE Viewer when I was trying to extract assets.
Go back to UE Viewer and export your texture. It can be exported as a TGA (uncompressed) or a DDS (sometimes a texture may bug out as a TGA; you will know because there are black dots everywhere). There will be a UModelExport folder wherever you put your UEViewer. In my case, it’s within the game’s folder itself.
Make a backup of your texture if you want. Open your texture in your image editing program and what you do here is dependent on your skill level as a texture modder.

Save it as a TGA, even if you exported as a DDS, and keep the exact same name. The reason why I’m saving as TGA for this tutorial and not DDS is because Unreal Editor throws out an error (for me personally) when trying to import DDS files from UE Viewer or even those saved in Photoshop. I was not able to proceed with texture modding by using DDS because of this. TGA files are compatible with Unreal Editor and they are saved in the DDS format through there anyways once baked. The default option in Unreal Editor will work for BnS for the types of textures I’m doing, which are mostly recolors or minor edits.
This is it for saving the texture part. Now we can set up Unreal Editor
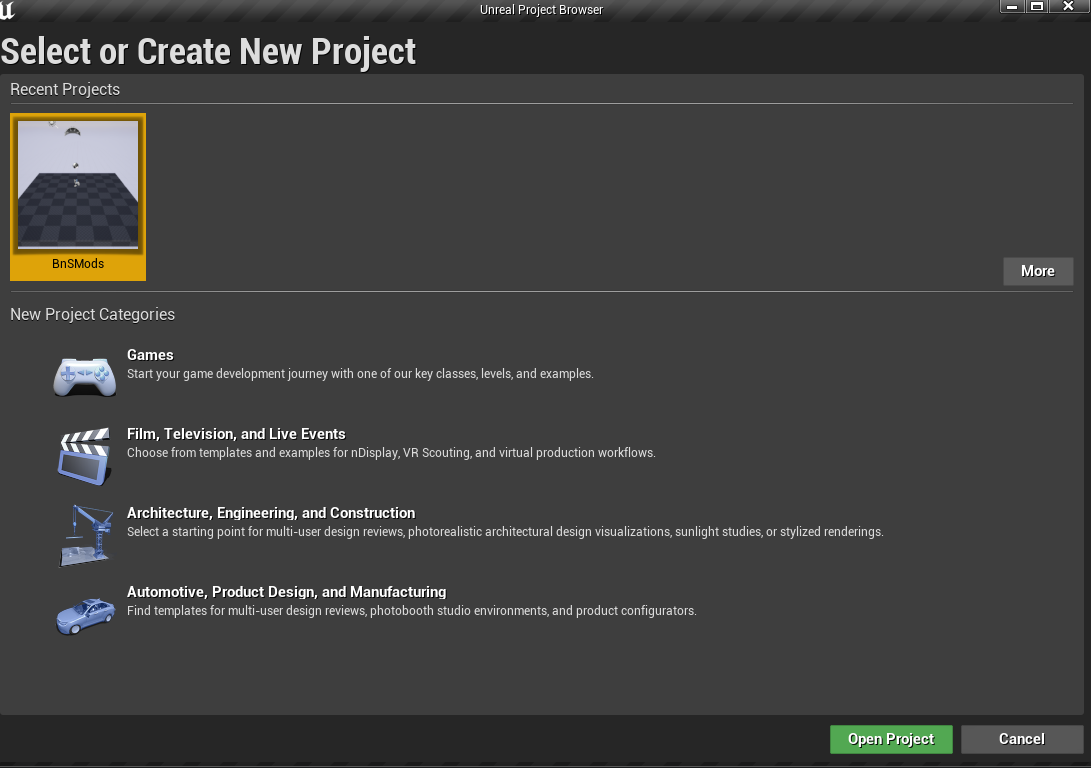
Go through the process of downloading the Unreal Editor. Once you're inside the Epic Games launcher, make sure you get version 4.25.4. This is the one BnS uses.
Here, I already have my workspace set up but I'll guide you through just setting up a blank project for texture modding.
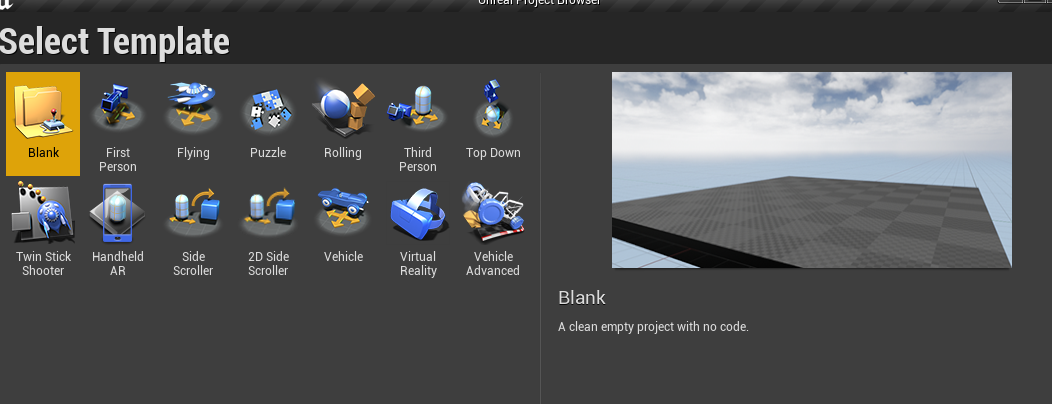
Choose Games.
Choose Blank.
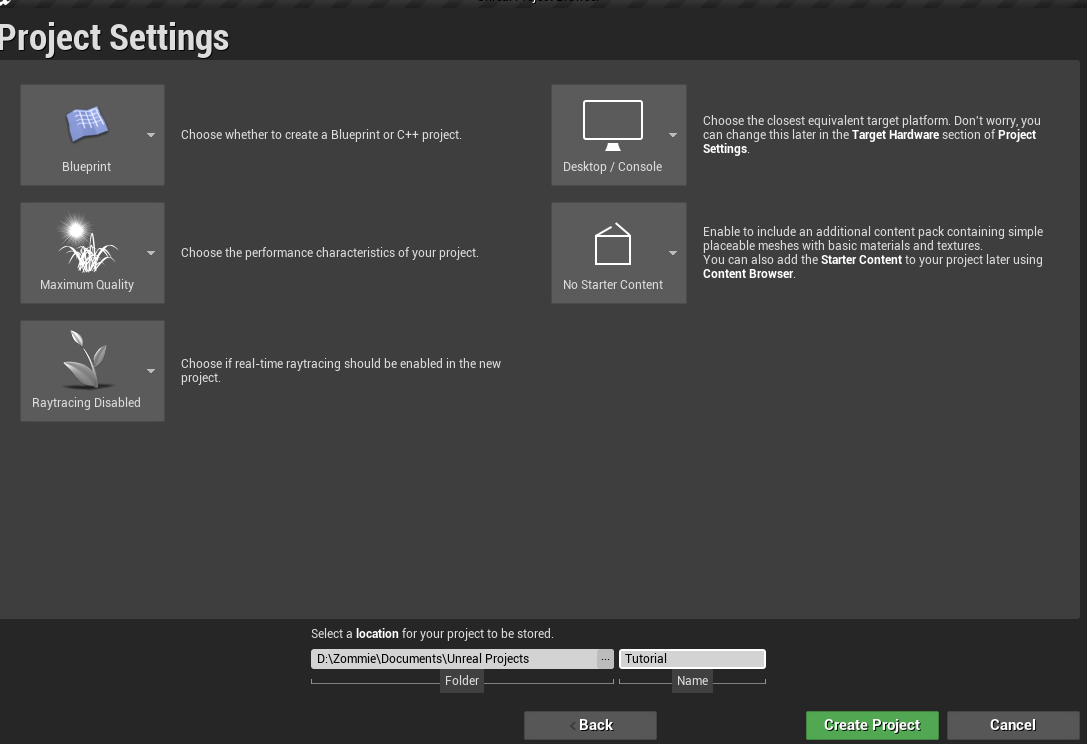
And everything here is fine. Name it whatever you want and remember it will be located in your Documents.
- After you have your blank project, we need to rebuild the exact folders paths used inside the game’s files. This is also the reason why in the Optional Step, you needed to unpack your pak if it was a new outfit.
If your mod fails to load in the game, it is likely because you didn’t rebuild the exact folder path. You can follow my folders for the tutorial and you will understand how to do it on your own if you start doing textures from other categories. The folders don’t change much.
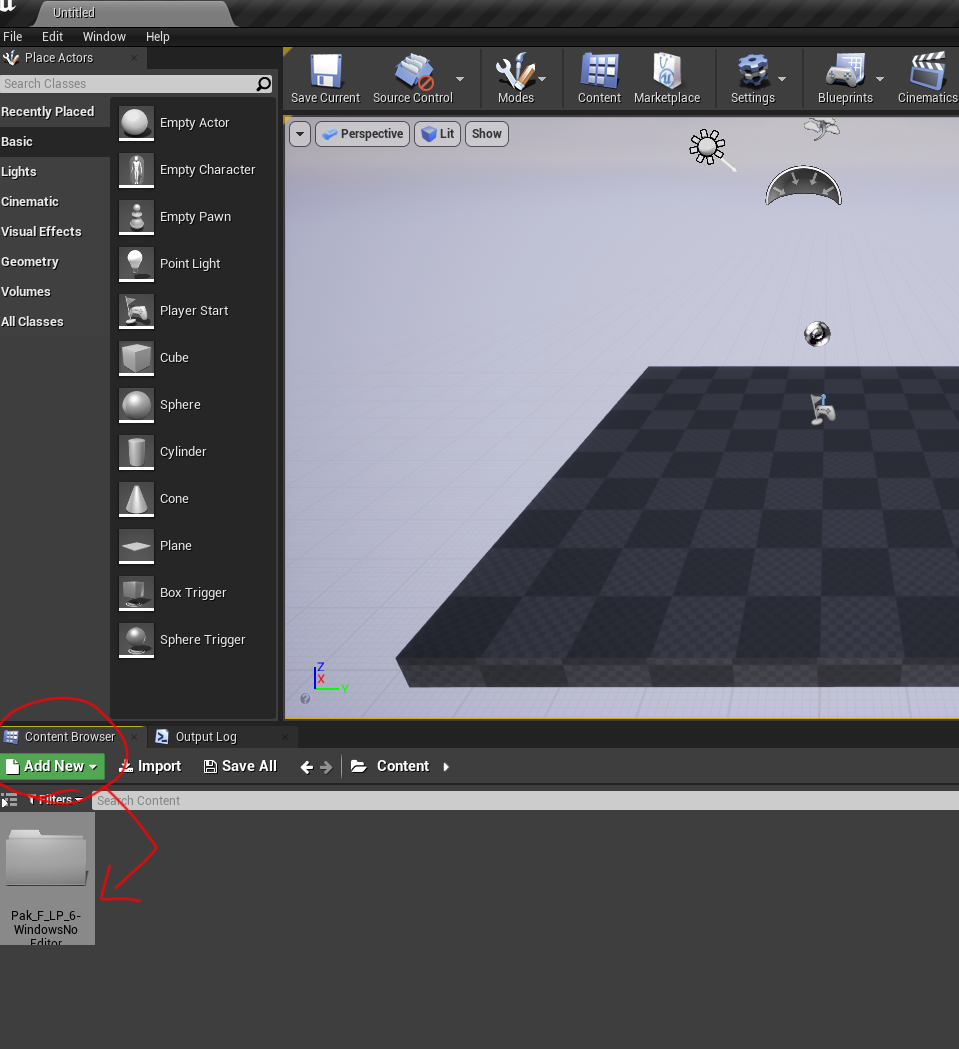
In the content browser of the Editor, make a new folder. Name it the exact name of the Pak you found in the Pak File List or as the one you extracted. In my case, it’s Pak_F_LP_6-WindowsNoEditor.
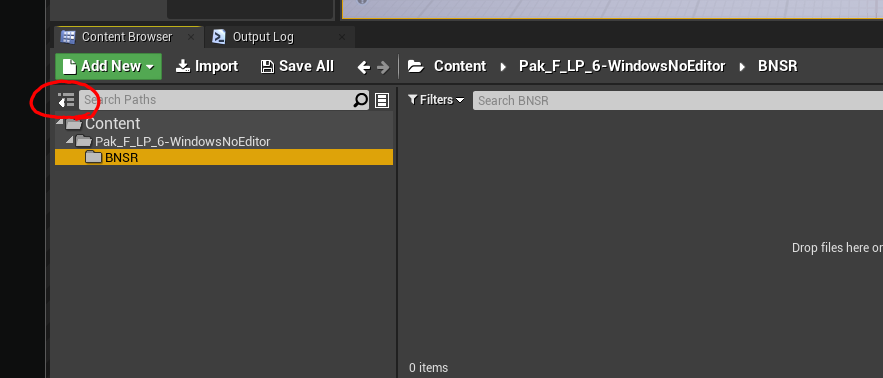
Now just keep making folders inside the first folder that rebuild the exact path in the game's files. The next folder inside will be BNSR. If you toggle the "Show or hide the sources panel" then you can see the folders even easier.
Now make a folder inside the BNSR folder. The next one is Content. Once you get to the folder with the Korean characters, you can just copy and paste it.
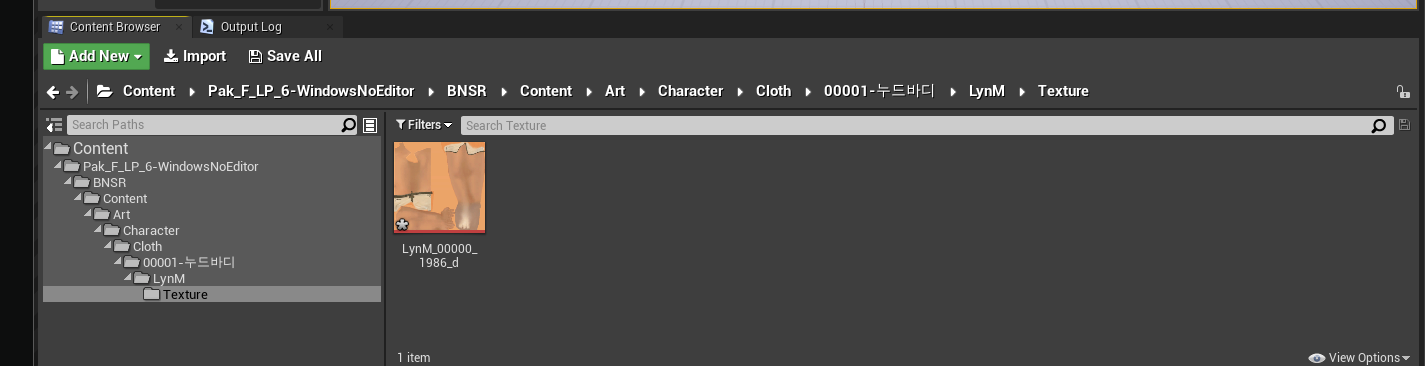
I stopped after LynM and did not make a "Mesh" folder. This is because this would be the wrong folder to make for texture edits. The next folder is actually called Texture and you can see it is set up like this in the extracted pak.
Now everything will be set up properly. Once you are at the final folder, you just drop your TGA files in here named exactly how they appear in the game. If you need to make any edits to your textures back in your image editing program, you don’t have to redrop them. You can simply choose to “re-import” by clicking on the texture and it will pull up a new window; the saved changes to the TGA will appear. The default options for Unreal Editor will work for BnS so far for me. I have not experienced crashes (other than the shitty game crashing for no reason regardless of mods). The Editor will take care of saving them as a DDS for you.
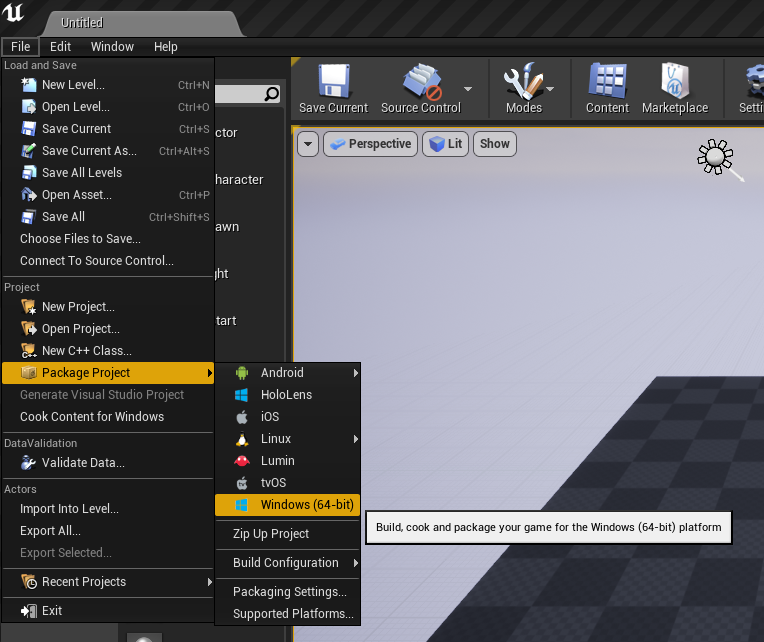
Now it’s time to “bake” it in Unreal Engine. This will give you the exact files that the game will be able to read.
Go to File, Package Project, and pick Windows 64 bit. You just choose “Select Folder” after that. It will start to give you the files you need and the first time you do this, it may take a while but will be faster afterwards.
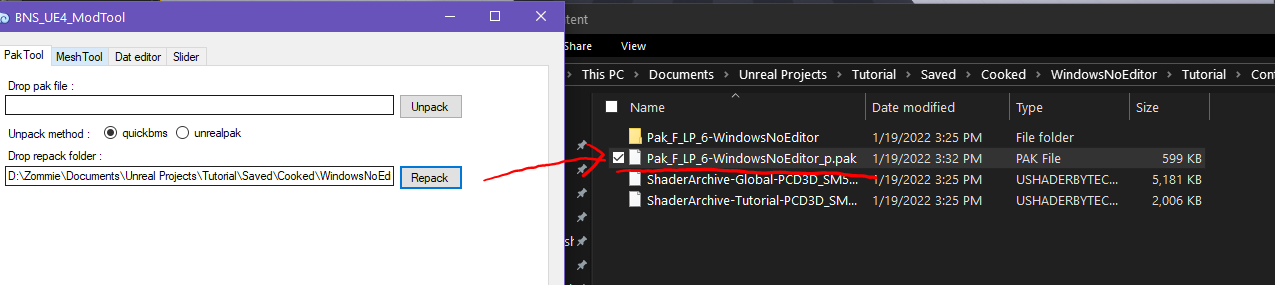
For me, the files I need are in this path. I’ve seen people have different paths but you can make sure you have the right files if they look like this. Now it’s time to repack your folder.
Optional
If you plan to do many different types of mods, you can organize yourself in the Content Browser with some folders. Like my Texture and Font folders. But do keep in mind you cannot add new folders inside the folders starting with the Pak names. You also can’t have too many folders prior to the Pak name folder or Unreal Editor will throw out an error and be unable to repack your files.
Here, I already have my workspace set up but I'll guide you through just setting up a blank project for texture modding.
Choose Games.
Choose Blank.
And everything here is fine. Name it whatever you want and remember it will be located in your Documents.
- After you have your blank project, we need to rebuild the exact folders paths used inside the game’s files. This is also the reason why in the Optional Step, you needed to unpack your pak if it was a new outfit.
If your mod fails to load in the game, it is likely because you didn’t rebuild the exact folder path. You can follow my folders for the tutorial and you will understand how to do it on your own if you start doing textures from other categories. The folders don’t change much.
In the content browser of the Editor, make a new folder. Name it the exact name of the Pak you found in the Pak File List or as the one you extracted. In my case, it’s Pak_F_LP_6-WindowsNoEditor.
Now just keep making folders inside the first folder that rebuild the exact path in the game's files. The next folder inside will be BNSR. If you toggle the "Show or hide the sources panel" then you can see the folders even easier.
Now make a folder inside the BNSR folder. The next one is Content. Once you get to the folder with the Korean characters, you can just copy and paste it.
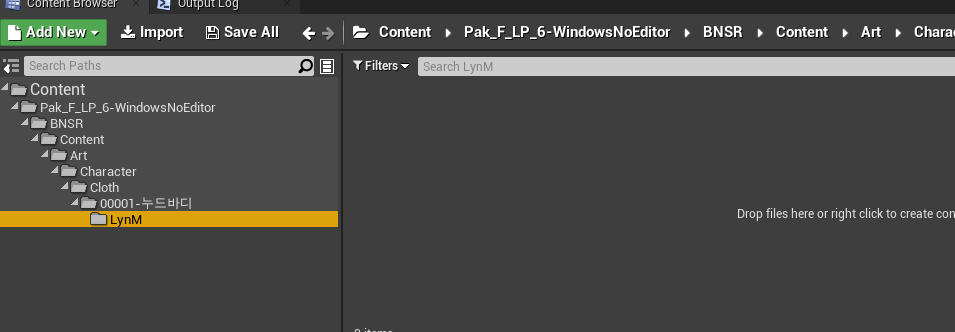
I stopped after LynM and did not make a "Mesh" folder. This is because this would be the wrong folder to make for texture edits. The next folder is actually called Texture and you can see it is set up like this in the extracted pak.

Now everything will be set up properly. Once you are at the final folder, you just drop your TGA files in here named exactly how they appear in the game. If you need to make any edits to your textures back in your image editing program, you don’t have to redrop them. You can simply choose to “re-import” by clicking on the texture and it will pull up a new window; the saved changes to the TGA will appear. The default options for Unreal Editor will work for BnS so far for me. I have not experienced crashes (other than the shitty game crashing for no reason regardless of mods). The Editor will take care of saving them as a DDS for you.
Now it’s time to “bake” it in Unreal Engine. This will give you the exact files that the game will be able to read.
Go to File, Package Project, and pick Windows 64 bit. You just choose “Select Folder” after that. It will start to give you the files you need and the first time you do this, it may take a while but will be faster afterwards.
For me, the files I need are in this path. I’ve seen people have different paths but you can make sure you have the right files if they look like this. Now it’s time to repack your folder.

Optional
If you plan to do many different types of mods, you can organize yourself in the Content Browser with some folders. Like my Texture and Font folders. But do keep in mind you cannot add new folders inside the folders starting with the Pak names. You also can’t have too many folders prior to the Pak name folder or Unreal Editor will throw out an error and be unable to repack your files.

Simply drag the folder that Unreal Editor gave you into the ModTool's "Repack". The file you get back that has a _p.pak at the end is what you need.
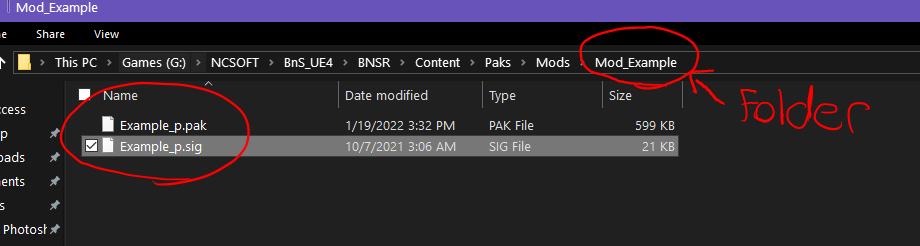
You can rename your mod now to whatever you want BUT make sure that there is a _p at the end before the extension. Also, I highly suggest putting your mod inside of a folder and starting the name with "Mod_". The reason for this is because there was an issue of games not starting up due to certain mods if a voice pack mod is also present. Having the folder set up makes sure that your mod is fully compatible with all other mods. I'm not sure why this happens with UE4 mods.
For example, this is what my mod will have to be named. Now you grab any sig from the pak folder inside your BnS game and give it the exact same name with the _p at the end as well. This works for now but unfortunately, a change to how the sig works is coming and custom sigs will have to be made later on. Once that happens and someone finds a way to make custom sigs, I will update the tutorial but the change is not live in NA/EU yet.
Your mod will load into the game now by putting it inside a “Mods” folder along with the paks.
If you have any suggestions on how to improve the tutorial or know ways to make this entire process even faster and more efficient, please let me know. I just started texture modding UE4, so my knowledge is very basic on how to get all of this working again.
As an extra tip, if you’re knowledgeable about Blender, you can import the mesh into it and work on your textures that way. This way, you don’t have to keep loading in the game for previews. It saves a lot of time. Some texture colors will still look different in the game vs Blender, though. This is something I used to do back in UE3.
Last edited: