
Naryu Foundry is located on the new island, Khanda Vihar, and requires you to complete the introductory quest chain for the new island.
Requirements:
Corridor:
The first corridor is filled with various trash mobs. At the end will be a gate with three elites defending it. Only these three need to be killed, if your party has an Assassin they can use Lotus of Rescue to help the party through this path.
After this door is opened, there will be a spiral path with wall of fire and three enemies and one elite at the end. Killing these four will despawn the wall of fire.
There is one more segment before the miniboss, just glide over the enemies.
Lavabiter:
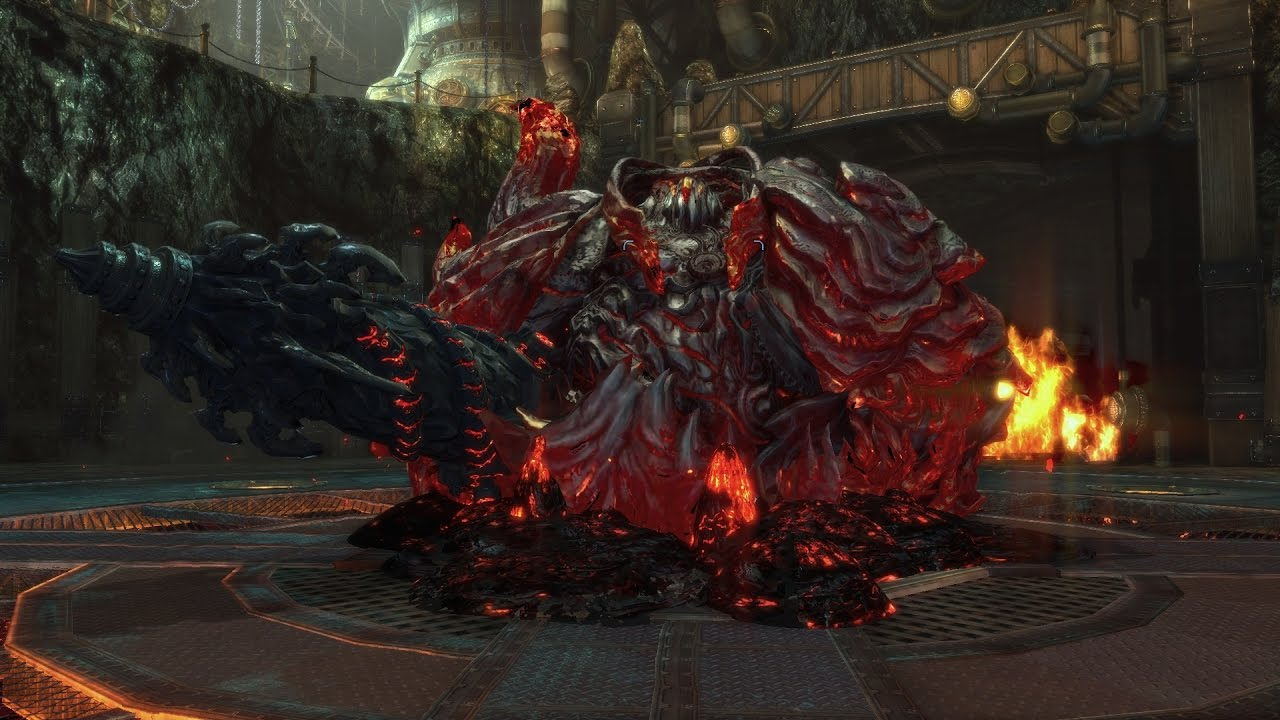
Normal HP: 11,088,000
Hard HP: 16,800,000
Enrage: None
CC: N/A
This miniboss has a similar rotation to an Augerite. If the tank stands 5 meters or further, Lavabiter will do a field-wide unblockable Phantom Grip and pull everyone in close proximity, then do a blockable spin that knocks back; the tank must stand in melee range at all times to avoid this.
After a full rotation, a message warns “Lavabiter has summoned a Flame Wraith”. Three lava puddles will be shot under the tank, they don’t do much damage so the tank can easily lifesteal through it, and should keep them organized so other melee classes can attack the boss.
Every 5 seconds since the boss was engaged, everyone will receive the Ember debuff for 30 seconds and stacks up to 20 times. Standing in the lava puddle will also stack Ember.
At the same time the lava puddles are being shot, two Flame Wraiths will be approaching from the room’s entrance and exit, pause 16 meters from the tank, then attempt to self-destruct which strikes the entire room, detonating Ember for massive damage; as the tank is constantly standing in the lava puddles and having max Ember stacks the explosion is very likely to kill them in one hit. 1x CCing them in the middle of the self-destruct animation will kill the Fiends without inflicting any harm.
Corridor:
Another corridor with various mobs, with two elite mobs at the end. An Assassin can use Lotus of Rescue to bypass the mobs, although they may not be able to do so immediately due to the residual Ember stacks from Lavabiter.
Fire Stomper:
Normal HP: 6,032,400
Hard HP: 9,140,000
Enrage: None
CC: 4x
This miniboss fights similarly to Minou of Naryu Labyrinth, and patrols a bridge with a flame at the end.
The bridge is divided into four parts. Every 15 seconds, a message warns “Fire Stomper is activating flames” and a fourth of the bridge will be covered in flames that instantly kills players on contact. It is advised to engage the miniboss near the start, to ensure that your party has the maximum amount of time to fight the boss, 1 minute. This miniboss can be cheesed if you stand near the doorway, where the fire will not kill you, but take care not to accidentally reset him.
Rocnar:
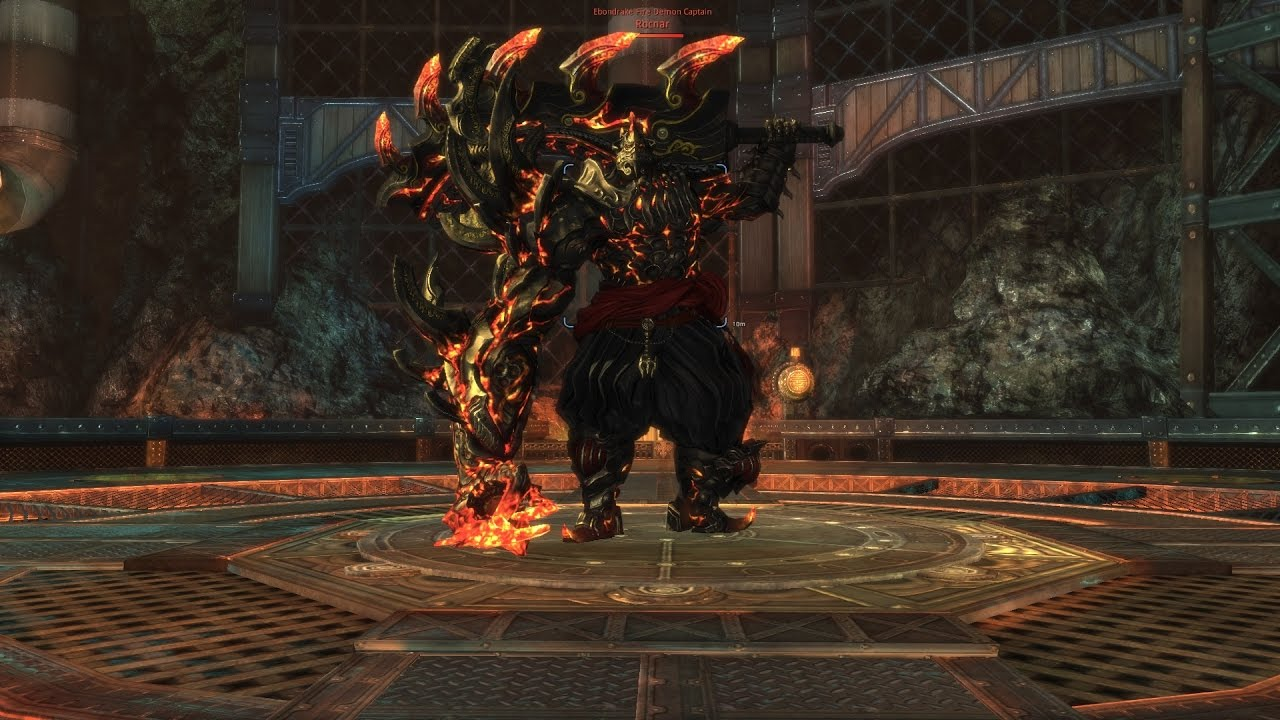
Normal HP: 57,024,000
Hard HP: 86,400,000
Enrage: 7:00
CC: 4x
4x Stun/Daze and Airborne Launch is required. Stealth from Assassin/Summoner or Airborne Resistance from Destroyer/Force Master is helpful, but can be compensated for higher DPS.
Rotation:
Rocnar fights almost identically to Zakhan from Ebondrake Citadel, with extremely fast and random attacks. However he doesn’t do wipe crescent sweeps or exploding circles, but is not CC’able at any point in his attacks.
If the tank stands 9 meters or further away, Rocnar will teleport behind them. If Rocnar teleports away, the tank should stay in the center of the room and let him come back due to the first mechanic below.
Flame Wall:
Starting at 98% and then every 40 seconds after, a message warns “A flame wall is closing in” and a wall of fire will spawn from 12:00, 3:00, 6:00, or 9:00 positions chosen at random and sweeps across the room. This wall stacks one layer (sometimes two or three) of “Burn” on players if touched, which deals damage over time and can be very dangerous at 2 or 3 stacks, so it is important to iframe this. If the boss touches the wall, it will gain a stack of “Saving Fire” and heal for 5% of its maximum health; on 3 stacks Rocnar will enrage and wipe the party.
As the flame wall approaches, Rocnar will fire four projectiles similar to Zakhan’s, and become vulnerable to CCs. He will do this attack up to two times. As Rocnar is firing the projectiles, he can be 4x CC’d and should be done so with stun while as close to the wall as possible. After disabling Rocnar, he must be knocked airborne over the sweeping fire wall. Classes with long aerial attacks, such as Blade Masters or Blade Dancers can make this easier to time. Assassin’s can also use Webbing to suspend the boss in the air, but note that the party should agree on this method, as if the boss is hit while webbed, the webbing will break and he will fall to the ground. If a melee is extending the aerial duration of the boss, the fire wall will still hit them despite visually appearing above it. It is advised to use Blade Master's Winged Protector or Blade Dancer's Maelstrom while extending the aerial, or have a Summoner use their cat's aerial combo to extend the aerial duration if needed, preventing Burn from being applied onto the players.
Note that Rocnar is completely immune to grabs, preventing Destroyers from grabbing him and using Launch to throw him over the fire wall.
Heatwaves 90%/60%/30%:
At 90%, 60%, and 30%, Rocnar will teleport to the middle and a message warns “Heatwaves appear around Rocnar” where 8 fire flowers are spawned on the ground around him, at the 1:00, 2:00, 4:00, 5:00, 7:00, 8:00, 10:00, and 11:00 positions.
When players touch them, they will gain a layer of Burn and “Heat”, but iframing into the flower will prevent Burn. Note that there is a delay before the flowers can be touched after they spawn. Three stacks of Heat will transform the buff into “Fire”, which is needed in the mechanic, but taking another flower with Fire will detonate the buff for high damage and apply 1 stack of Heat.
Two players should take 3 flowers (one takes from 11:00, 1:00, and 2:00, this person is commonly called “3L” named after the positions to the left of the entrance; the other takes from 7:00, 5:00, and 4:00, this person is commonly called “3R” named after the positions to the right of the entrance). One player with Stealth (Assassin/Summoner) or Airborne Resistance (Destroyer/Force Master) will take 2 flowers (from 8:00 and 10:00, this person is commonly called “2”). All remaining party members should not touch any of the flowers.
During this phase, Rocnar’s throws three wide linear crescent swings aimed in the direction of the closest person. Unlike Zakhan’s these only deal damage, don’t CC, and are blockable, but deals increasing damage based on the number of Burn stacks on those hit: 3 stacks of Burn will deal massive damage, 0 stacks will result in no damage being taken.
After throwing the three sweeps attacks, Rocnar will fire an blockable area of effect projectile at the farthest player. This projectile is often lured away from the rest of the party by the person who picked up 2 flowers. The 2 flower Summoner or Assassin must enter stealth; the Summoner can use the projectile to stealth themselves using the final 0.5 seconds of their Seed Shroud, casting right before the projectile comes out; the Assassin can use Shadow Dash into Hook Kick or Move 1 Lightning Shadow Slash as soon as the projectile leaves Rocnar's hand; or both can purposely get hit by the projectile and use Backstep or Stealth respectively, with their back facing Rocnar so that they don’t avoid the projectile.
Rocnar will then lift all visible players and absorb the remaining flowers on the ground. This aerial lift will only lift players that are visible, and only occurs at the start of the absorption. Destroyers can immune the lift with their Typhoon and Force Masters can immune the lift with the first 0.5 seconds of casting Frost Armor. The party member with 2 stacks of the flower buff should make sure to not get lifted, in order to ensure that the boss does not heal. Conversely, the party members who took 3 stacks of the flower buff must be lifted in order to damage the boss. For players with 0 stacks of the flower buff, it doesn’t matter whether they get lifted. If a Blade Master, Force Master, or Destroyer are present, they should use their party protection skills before the lift.
For each flower that Rocnar absorbs, it will heal for 5% of its maximum health. For players that were lifted while carrying 1/2 Heat stacks, the boss will heal for 5% of its maximum health per player. For each player lifted while carrying Fire, from 3 stacks of the flower buff, Rocnar will take 7% of its maximum health in damage.
At the end of the lift, players will take a large amount of damage. The Assassin or Summoner that isn’t lifted should use their party protection at this time to prevent this damage. Do not use it on the start of the lift or everyone will get into stealth, and nobody will get lifted.
Normal Mode Differences:
Corridor:
The final corridor mimics the first corridor at the start of this dungeon, again have an Assassin use Lotus of Rescue and kill the 3 elite mobs guarding the boss chamber.
Acrimor:
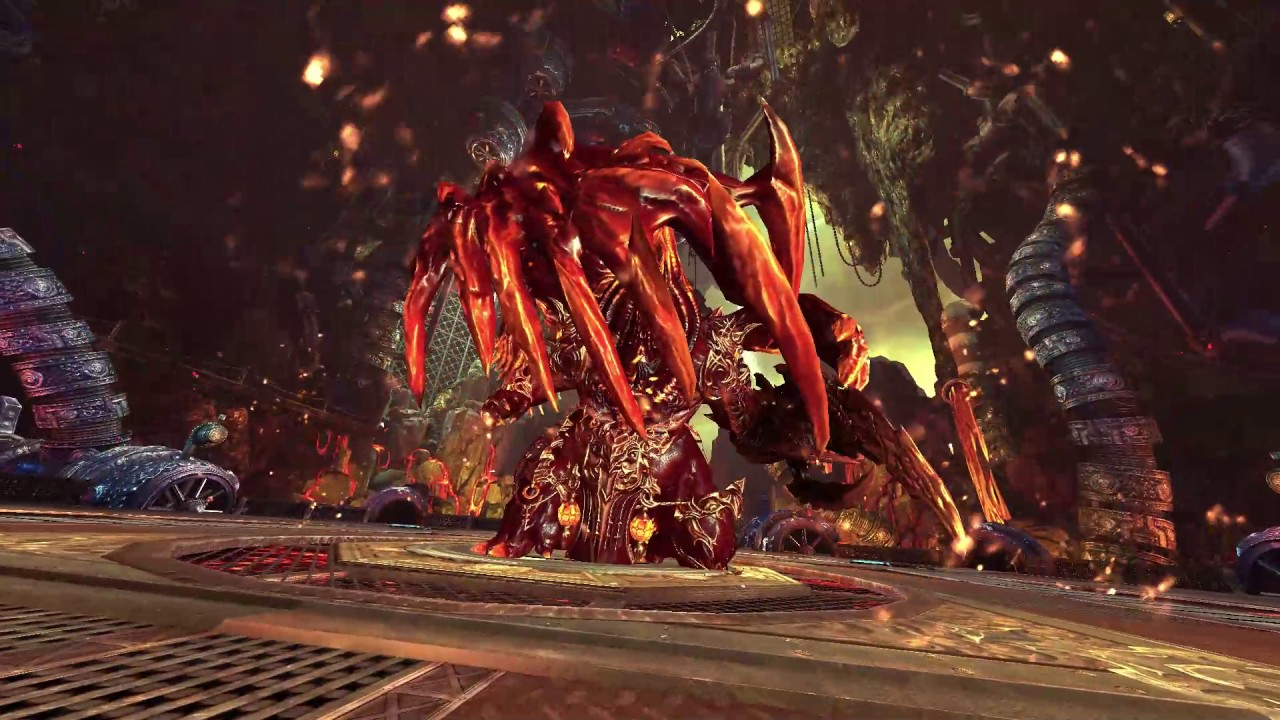
Normal HP: 53,856,000
Hard HP: 81,600,000
Enrage: 10:00
CC: 4x
Acrimor has slightly less health than Rocnar, but deals no damage to himself, so all damage dealt to him solely comes from the players.
Rooting is required, but be careful not to root at the wrong time; whenever rooted, Acrimor gains a 10 second "Unstoppable" buff making him immune to subsequent roots.
Rotation:
If the tank stands 9 meters or further away, Acrimor tries to leash them in and slam them into the ground. If the leash fails and the tank is still too far, Acrimor jumps at them creating an area of effect impact. Both attacks are unblockable.
Jump:
Roughly every 35 seconds, Acrimor will face the furthest person and vocally declare "Resistance is futile!" or "Nowhere to run!" He then balances himself on his hind legs before jumping to the furthest person, creating an unblockable AoE on impact that knocks down. After landing, Acrimor turns to the tank and releases a long-ranged linear unblockable flamethrower. Finally, Acrimor will jump back to the tank, then resume whatever action he was doing prior.
A player will be required to root while Acrimor balances himself before he jumps to the farthest player so that he jumps in-place; this can be accomplished by Force Master’s Force Blast, Summoner’s Grasping Roots, and Warlock’s Move 1 and 3 Soul Shackle (Move 3 is easier to time). The rooter should try to stand on the opposite side of the boss, so that the flamethrower attack does not hit them. However, despite jumping in-place the AoE attack will still be centered on the furthest person, instead of the area under the boss.
The tank should be standing in the middle, so that the boss will land in the center when it jumps back to the tank. It is very important that the tank is in the boss’s field of view so that the boss’s attacks are not delayed, and so that the mark buff is not delayed.
Fevered Debuff:
When the fight starts, a message warns “Acrimor is heating up the furnace.” Every 5 seconds, everyone will gain a stack of “Fevered”. This debuff deals 272 damage every 2 seconds, lasts 30 seconds, and stacks up to 99 times. In addition, getting hit by Acrimor’s flamethrower attack will rapidly stack Fevered even if iframed. The only way to cleanse this debuff is by filling all 8 fan ports and cooling down the boss via mechanic. It is advisable to have high health pools, healers, and good defensive gear to survive this constant damage over time.
Scorching Hot:
After sometime, a message warns “Acrimor is scorching hot!” and his body will turn blistering red. During this, Acrimor’s swipes become much faster, all his attacks do more damage, and his rotation changes:
Ball Driving:
The main mechanic of the final boss involves driving balls into fan ports, which upon filling all 8 will cool down the boss and prevent it from overheating. If the boss is not cooled down, he will enrage and wipe the party. There are 4 phases to this fight, and they involve the various structures in the room listed in the minimap.
If the ball touches a player or the boss, or travels for too long, it will explode and create a 16 meter damaging area of effect that stuns. If the ball hits a filled fan port, it will simply travel back out.
10 seconds into the fight, and then every 25 seconds after, a message warns “Acrimor is preparing a shower of Heat Sparks” and 5 seconds after the message (immediately on the first time) Acrimor will mark the closest two players with “Searing Charge”. Acrimor will not mark when he is doing his jump rotation. The markers should make sure that they are standing inside the boss, so that other players will not get the mark by mistake. This mark applies Fevered to nearby players that constantly pulses in a 1 meter area of effect and lasts for 30 seconds, however there is no visible countdown duration on the mark but will end shortly after the message.
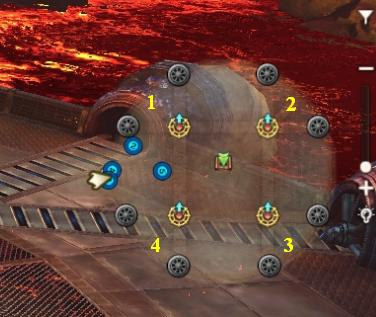
Marked players can stand on the dials, each pulse will rotate them by 90° clockwise.
Below is the optimal starting positions for each dial. The dials are pointed towards these specific directions, so that one 90° rotation will point the dial towards the next port. This minimizes the amount of time spent rotating each dial during the ball driving phase.
If your party is not confident, you may preset the dials to the optimal position, then have the party escape in order to begin the fight with the dials in the optimal positions.
The general idea of ball driving is to minimize the amount of time that it takes for each ball to be driven into a fan port. High mobility classes such as Destroyers, Blade Dancers, Soul Fighters, Assassins, or Force Masters excel at this.
Your party may assign either 1 or 2 markers to complete this mechanic. If a player understands this well, and can do the entire ball driving mechanic solo, your party may opt for 1 ball driver only. Your party can also assign two ball drivers, each doing half of the room, and may be more beneficial for parties with multiple low mobility classes.
When a ball enters a port, the party gains a 10 second “Cool” buff that heals 6,000 per 2 seconds. Once a port has been filled up, the drivers should rotate the dial to the next open port. Make sure to always try and drive the balls in the shortest possible path. If one quadrants fans are filled, point the dial to the next quadrant.
Once all 8 fans are filled, a message warns “Fans blow through the Furnace. Acrimor has cooled down” and Acrimor will stop whatever attack he is doing (including cancelling his soft enrage), remove his scorching hot phase, and reset his attack rotation. Everyone’s Fevered debuff will also be cleansed.
Ball Driving: Phase 1 and 2:
In this phase, 1 ball spawns at time. The chart below will indicate which ball spawns at which port.
Ball
Spawn
1
1 or 2
2
2 or 3
3
3 or 4
4
4 or 1
5
1 or 2
6
2 or 3
7
3 or 4
8
4 or 1
In these phases, you have approximately 3 minutes to fill up all 8 ports, or else the boss will overheat and enrage. Acrimor will become scorching hot after 2 minutes.
During these phases the last ball will always spawn on the left side, so the driver should leave that side more empty.
After each phase, make sure that the dials have been reset to the starting position, in order to prepare for the following phase.
Ball Driving: Phase 3 and 4:
On the start of the third phase, a message warns “The number of Power Grids have increased.” Unlike phases 1 and 2, phases 3 and 4 now spawn pairs of balls. These pairs will always be located at opposite corners of the room. The chart below will indicate which ball spawns at which port.
Ball
Spawn
1 and 2
1 and 3
3 and 4
2 and 4
5 and 6
1 and 3
7 and 8
2 and 4
In these phases, you have approximately 1 minute and 40 seconds to fill up all 8 port holes, or else the boss will overheat and enrage. He will enter scorching hot after 1 minute instead of 2 during these phases. Acrimor can also perform his jump rotation twice in a row, so be prepared.
On completing the 4th phase, a message warns “The Power Grids are not generated anymore.” No more balls will spawn, but people will still be generating Fevered stacks and Acrimor can still overheat and enrage, so this final trek is a DPS race.
Normal Mode Differences:
Requirements:
- Completion of Khanda Vihar: Chapter 5
- Aerial Launch (Only Destroyer cannot launch)
- 4x CC (Stun/Daze)
- Root (Preferred Warlock or Summoner, Force Master)
- 650+ AP or higher (20k+ dps in Hard minimum)
- (Highly Recommended) Stealth (Summoner or Assassin) / Airborne Resistance (Destroyer or Force Master)
- Mobile Classes (Dashes/Spin)
- Summoner or Soul Fighter for party healing
- High level pet, belt and amethyst
- Forging Orbs - Mainstream Legendary Baleful/Seraph Stage 7-8-9-10 upgrade material
- Eternity Belt Stage 1
- Awakened Acrimor Necklace
- Acrimor Soul Shield
- Meiyu: Writer
- Praetor19, Litewarior, Shadovv: Corrections
- Basic Ball Driving Guide for Hell Furnace by Risquesse
- Furnace (Foundry) Explanation by Tony (Praetor19)
- Ball Driver POV with Commentary by Risquesse
Corridor:
The first corridor is filled with various trash mobs. At the end will be a gate with three elites defending it. Only these three need to be killed, if your party has an Assassin they can use Lotus of Rescue to help the party through this path.
After this door is opened, there will be a spiral path with wall of fire and three enemies and one elite at the end. Killing these four will despawn the wall of fire.
There is one more segment before the miniboss, just glide over the enemies.
Lavabiter:
Normal HP: 11,088,000
Hard HP: 16,800,000
Enrage: None
CC: N/A
This miniboss has a similar rotation to an Augerite. If the tank stands 5 meters or further, Lavabiter will do a field-wide unblockable Phantom Grip and pull everyone in close proximity, then do a blockable spin that knocks back; the tank must stand in melee range at all times to avoid this.
After a full rotation, a message warns “Lavabiter has summoned a Flame Wraith”. Three lava puddles will be shot under the tank, they don’t do much damage so the tank can easily lifesteal through it, and should keep them organized so other melee classes can attack the boss.
Every 5 seconds since the boss was engaged, everyone will receive the Ember debuff for 30 seconds and stacks up to 20 times. Standing in the lava puddle will also stack Ember.
At the same time the lava puddles are being shot, two Flame Wraiths will be approaching from the room’s entrance and exit, pause 16 meters from the tank, then attempt to self-destruct which strikes the entire room, detonating Ember for massive damage; as the tank is constantly standing in the lava puddles and having max Ember stacks the explosion is very likely to kill them in one hit. 1x CCing them in the middle of the self-destruct animation will kill the Fiends without inflicting any harm.
Corridor:
Another corridor with various mobs, with two elite mobs at the end. An Assassin can use Lotus of Rescue to bypass the mobs, although they may not be able to do so immediately due to the residual Ember stacks from Lavabiter.
Fire Stomper:
Normal HP: 6,032,400
Hard HP: 9,140,000
Enrage: None
CC: 4x
This miniboss fights similarly to Minou of Naryu Labyrinth, and patrols a bridge with a flame at the end.
The bridge is divided into four parts. Every 15 seconds, a message warns “Fire Stomper is activating flames” and a fourth of the bridge will be covered in flames that instantly kills players on contact. It is advised to engage the miniboss near the start, to ensure that your party has the maximum amount of time to fight the boss, 1 minute. This miniboss can be cheesed if you stand near the doorway, where the fire will not kill you, but take care not to accidentally reset him.
Rocnar:
Normal HP: 57,024,000
Hard HP: 86,400,000
Enrage: 7:00
CC: 4x
4x Stun/Daze and Airborne Launch is required. Stealth from Assassin/Summoner or Airborne Resistance from Destroyer/Force Master is helpful, but can be compensated for higher DPS.
Rotation:
Rocnar fights almost identically to Zakhan from Ebondrake Citadel, with extremely fast and random attacks. However he doesn’t do wipe crescent sweeps or exploding circles, but is not CC’able at any point in his attacks.
- Fast single downward frontal swing. Sometimes he will follow up with two more downward swings, which have near instantaneous speed. Causes knockdown. Being hit by this three times in a row will cause a massive drop in aggro, so be very careful if you are the tank. Blockable.
- Fast double 180 degree frontal swipes. Second hit causes daze. Blockable.
- Leans backward and leaps forward into an unblockable spinning sawblade on the target, dealing multiple hits and has a small area of effect splash, inflicts Daze.
- Drags his blade across the ground and throws a narrow long-ranged frontal unblockable crescent energy wave. Surprisingly very slow.
- Teleports away from the tank. Is immune to damage while teleporting.
If the tank stands 9 meters or further away, Rocnar will teleport behind them. If Rocnar teleports away, the tank should stay in the center of the room and let him come back due to the first mechanic below.
Flame Wall:
Starting at 98% and then every 40 seconds after, a message warns “A flame wall is closing in” and a wall of fire will spawn from 12:00, 3:00, 6:00, or 9:00 positions chosen at random and sweeps across the room. This wall stacks one layer (sometimes two or three) of “Burn” on players if touched, which deals damage over time and can be very dangerous at 2 or 3 stacks, so it is important to iframe this. If the boss touches the wall, it will gain a stack of “Saving Fire” and heal for 5% of its maximum health; on 3 stacks Rocnar will enrage and wipe the party.
As the flame wall approaches, Rocnar will fire four projectiles similar to Zakhan’s, and become vulnerable to CCs. He will do this attack up to two times. As Rocnar is firing the projectiles, he can be 4x CC’d and should be done so with stun while as close to the wall as possible. After disabling Rocnar, he must be knocked airborne over the sweeping fire wall. Classes with long aerial attacks, such as Blade Masters or Blade Dancers can make this easier to time. Assassin’s can also use Webbing to suspend the boss in the air, but note that the party should agree on this method, as if the boss is hit while webbed, the webbing will break and he will fall to the ground. If a melee is extending the aerial duration of the boss, the fire wall will still hit them despite visually appearing above it. It is advised to use Blade Master's Winged Protector or Blade Dancer's Maelstrom while extending the aerial, or have a Summoner use their cat's aerial combo to extend the aerial duration if needed, preventing Burn from being applied onto the players.
Note that Rocnar is completely immune to grabs, preventing Destroyers from grabbing him and using Launch to throw him over the fire wall.
Heatwaves 90%/60%/30%:
At 90%, 60%, and 30%, Rocnar will teleport to the middle and a message warns “Heatwaves appear around Rocnar” where 8 fire flowers are spawned on the ground around him, at the 1:00, 2:00, 4:00, 5:00, 7:00, 8:00, 10:00, and 11:00 positions.
When players touch them, they will gain a layer of Burn and “Heat”, but iframing into the flower will prevent Burn. Note that there is a delay before the flowers can be touched after they spawn. Three stacks of Heat will transform the buff into “Fire”, which is needed in the mechanic, but taking another flower with Fire will detonate the buff for high damage and apply 1 stack of Heat.
Two players should take 3 flowers (one takes from 11:00, 1:00, and 2:00, this person is commonly called “3L” named after the positions to the left of the entrance; the other takes from 7:00, 5:00, and 4:00, this person is commonly called “3R” named after the positions to the right of the entrance). One player with Stealth (Assassin/Summoner) or Airborne Resistance (Destroyer/Force Master) will take 2 flowers (from 8:00 and 10:00, this person is commonly called “2”). All remaining party members should not touch any of the flowers.
During this phase, Rocnar’s throws three wide linear crescent swings aimed in the direction of the closest person. Unlike Zakhan’s these only deal damage, don’t CC, and are blockable, but deals increasing damage based on the number of Burn stacks on those hit: 3 stacks of Burn will deal massive damage, 0 stacks will result in no damage being taken.
After throwing the three sweeps attacks, Rocnar will fire an blockable area of effect projectile at the farthest player. This projectile is often lured away from the rest of the party by the person who picked up 2 flowers. The 2 flower Summoner or Assassin must enter stealth; the Summoner can use the projectile to stealth themselves using the final 0.5 seconds of their Seed Shroud, casting right before the projectile comes out; the Assassin can use Shadow Dash into Hook Kick or Move 1 Lightning Shadow Slash as soon as the projectile leaves Rocnar's hand; or both can purposely get hit by the projectile and use Backstep or Stealth respectively, with their back facing Rocnar so that they don’t avoid the projectile.
Rocnar will then lift all visible players and absorb the remaining flowers on the ground. This aerial lift will only lift players that are visible, and only occurs at the start of the absorption. Destroyers can immune the lift with their Typhoon and Force Masters can immune the lift with the first 0.5 seconds of casting Frost Armor. The party member with 2 stacks of the flower buff should make sure to not get lifted, in order to ensure that the boss does not heal. Conversely, the party members who took 3 stacks of the flower buff must be lifted in order to damage the boss. For players with 0 stacks of the flower buff, it doesn’t matter whether they get lifted. If a Blade Master, Force Master, or Destroyer are present, they should use their party protection skills before the lift.
For each flower that Rocnar absorbs, it will heal for 5% of its maximum health. For players that were lifted while carrying 1/2 Heat stacks, the boss will heal for 5% of its maximum health per player. For each player lifted while carrying Fire, from 3 stacks of the flower buff, Rocnar will take 7% of its maximum health in damage.
At the end of the lift, players will take a large amount of damage. The Assassin or Summoner that isn’t lifted should use their party protection at this time to prevent this damage. Do not use it on the start of the lift or everyone will get into stealth, and nobody will get lifted.
Normal Mode Differences:
- Rocnar does not teleport away unless the tank is too far from him, nor does he use his sawblade attack.
- Flame Wall does not start at 98%, instead it roughly appears once every minute and a half.
- Rocnar does not enrage from the Flame Wall despite gaining Saving Fire stacks.
- Heatwaves occur at 70%/30% instead of 90%/60%/30%.
- There are only two fire flowers instead of eight, which spawn on opposite ends of each other. These will give Heat stacks which will damage Rocnar as if they were Fire, but two Heat stacks on one person will still only do 7% damage.
- There are only two fire flowers instead of eight, which spawn on opposite ends of each other. These will give Heat stacks which will damage Rocnar as if they were Fire, but two Heat stacks on one person will still only do 7% damage.
- Flame Wall and Heatwaves heal Rocnar for 2.5% of its health instead of 5%.
Corridor:
The final corridor mimics the first corridor at the start of this dungeon, again have an Assassin use Lotus of Rescue and kill the 3 elite mobs guarding the boss chamber.
Acrimor:
Normal HP: 53,856,000
Hard HP: 81,600,000
Enrage: 10:00
CC: 4x
Acrimor has slightly less health than Rocnar, but deals no damage to himself, so all damage dealt to him solely comes from the players.
Rooting is required, but be careful not to root at the wrong time; whenever rooted, Acrimor gains a 10 second "Unstoppable" buff making him immune to subsequent roots.
Rotation:
- Triple 180 degree frontal swipes, all blockable
- Rear 180 degree wing swipe, then a 180 degree frontal wing slam, both blockable, second hit causes knockdown
- Triple frontal swipes
- One of the following:
- Three AoE spins, the last hit inflicts knockback and knockdown, all blockable.
- Wraps his wing around himself. This is a counter, if hit into he’ll unwrap his wing and swing it around in a blockable AoE, inflicts knockback and unconscious.
- Frontal linear flamethrower. Can be CC’d, but should be left alone due to mechanics below.
- Generates energy and then does a field-wide unblockable Phantom Grip to vacuum everyone in, then does a field-wide unblockable stomp that knocks back and down. Force Master’s/Destroyer’s Frost Sheath/Iron Plating does not activate on the Phantom Grip.
- Three AoE spins, the last hit inflicts knockback and knockdown, all blockable.
If the tank stands 9 meters or further away, Acrimor tries to leash them in and slam them into the ground. If the leash fails and the tank is still too far, Acrimor jumps at them creating an area of effect impact. Both attacks are unblockable.
Jump:
Roughly every 35 seconds, Acrimor will face the furthest person and vocally declare "Resistance is futile!" or "Nowhere to run!" He then balances himself on his hind legs before jumping to the furthest person, creating an unblockable AoE on impact that knocks down. After landing, Acrimor turns to the tank and releases a long-ranged linear unblockable flamethrower. Finally, Acrimor will jump back to the tank, then resume whatever action he was doing prior.
A player will be required to root while Acrimor balances himself before he jumps to the farthest player so that he jumps in-place; this can be accomplished by Force Master’s Force Blast, Summoner’s Grasping Roots, and Warlock’s Move 1 and 3 Soul Shackle (Move 3 is easier to time). The rooter should try to stand on the opposite side of the boss, so that the flamethrower attack does not hit them. However, despite jumping in-place the AoE attack will still be centered on the furthest person, instead of the area under the boss.
The tank should be standing in the middle, so that the boss will land in the center when it jumps back to the tank. It is very important that the tank is in the boss’s field of view so that the boss’s attacks are not delayed, and so that the mark buff is not delayed.
Fevered Debuff:
When the fight starts, a message warns “Acrimor is heating up the furnace.” Every 5 seconds, everyone will gain a stack of “Fevered”. This debuff deals 272 damage every 2 seconds, lasts 30 seconds, and stacks up to 99 times. In addition, getting hit by Acrimor’s flamethrower attack will rapidly stack Fevered even if iframed. The only way to cleanse this debuff is by filling all 8 fan ports and cooling down the boss via mechanic. It is advisable to have high health pools, healers, and good defensive gear to survive this constant damage over time.
Scorching Hot:
After sometime, a message warns “Acrimor is scorching hot!” and his body will turn blistering red. During this, Acrimor’s swipes become much faster, all his attacks do more damage, and his rotation changes:
- Triple frontal swipes
- Rear wing swipe, then frontal wing slam
- Triple Spin
- Flamethrower, with much farther range and width.
- Field-wide slam, but without the vacuum.
Ball Driving:
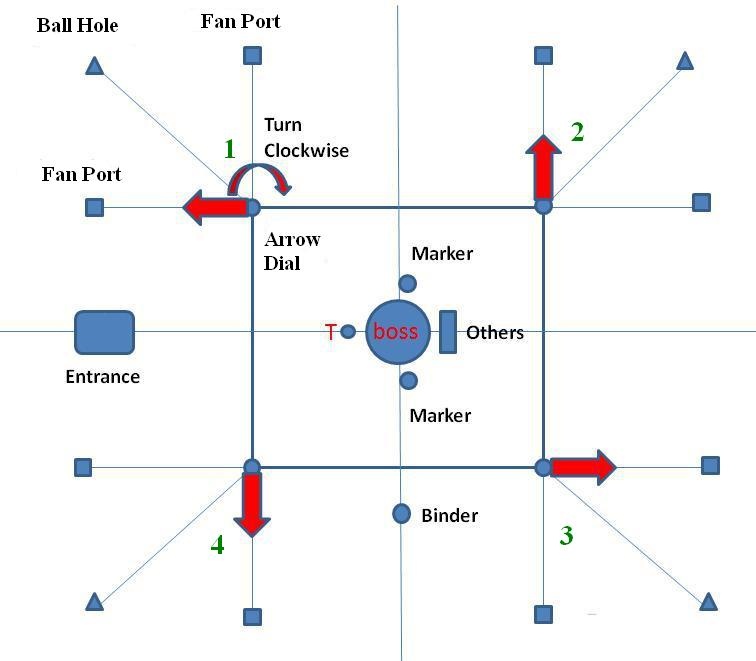
The main mechanic of the final boss involves driving balls into fan ports, which upon filling all 8 will cool down the boss and prevent it from overheating. If the boss is not cooled down, he will enrage and wipe the party. There are 4 phases to this fight, and they involve the various structures in the room listed in the minimap.
-
Ball Spawn: Located on the four corners of the room, where the numbers are tallied, balls will spawn from these and travel to the closest dial.
-
Dials: Appearing after the Ball Spawn, these direct the balls to the direction they are pointed towards.
-
Paths: The paths effectively form a square around the room, with the Dials on each corner that have paths leading to two fans on each, balls will only travel along these paths.
-
Fan: These are the places where balls should be directed into. A filled port will turn from gray to blue.


If the ball touches a player or the boss, or travels for too long, it will explode and create a 16 meter damaging area of effect that stuns. If the ball hits a filled fan port, it will simply travel back out.
10 seconds into the fight, and then every 25 seconds after, a message warns “Acrimor is preparing a shower of Heat Sparks” and 5 seconds after the message (immediately on the first time) Acrimor will mark the closest two players with “Searing Charge”. Acrimor will not mark when he is doing his jump rotation. The markers should make sure that they are standing inside the boss, so that other players will not get the mark by mistake. This mark applies Fevered to nearby players that constantly pulses in a 1 meter area of effect and lasts for 30 seconds, however there is no visible countdown duration on the mark but will end shortly after the message.
Marked players can stand on the dials, each pulse will rotate them by 90° clockwise.
Below is the optimal starting positions for each dial. The dials are pointed towards these specific directions, so that one 90° rotation will point the dial towards the next port. This minimizes the amount of time spent rotating each dial during the ball driving phase.
If your party is not confident, you may preset the dials to the optimal position, then have the party escape in order to begin the fight with the dials in the optimal positions.
The general idea of ball driving is to minimize the amount of time that it takes for each ball to be driven into a fan port. High mobility classes such as Destroyers, Blade Dancers, Soul Fighters, Assassins, or Force Masters excel at this.
Your party may assign either 1 or 2 markers to complete this mechanic. If a player understands this well, and can do the entire ball driving mechanic solo, your party may opt for 1 ball driver only. Your party can also assign two ball drivers, each doing half of the room, and may be more beneficial for parties with multiple low mobility classes.
When a ball enters a port, the party gains a 10 second “Cool” buff that heals 6,000 per 2 seconds. Once a port has been filled up, the drivers should rotate the dial to the next open port. Make sure to always try and drive the balls in the shortest possible path. If one quadrants fans are filled, point the dial to the next quadrant.
Once all 8 fans are filled, a message warns “Fans blow through the Furnace. Acrimor has cooled down” and Acrimor will stop whatever attack he is doing (including cancelling his soft enrage), remove his scorching hot phase, and reset his attack rotation. Everyone’s Fevered debuff will also be cleansed.
Ball Driving: Phase 1 and 2:
In this phase, 1 ball spawns at time. The chart below will indicate which ball spawns at which port.
Ball
Spawn
1
1 or 2
2
2 or 3
3
3 or 4
4
4 or 1
5
1 or 2
6
2 or 3
7
3 or 4
8
4 or 1
In these phases, you have approximately 3 minutes to fill up all 8 ports, or else the boss will overheat and enrage. Acrimor will become scorching hot after 2 minutes.
During these phases the last ball will always spawn on the left side, so the driver should leave that side more empty.
After each phase, make sure that the dials have been reset to the starting position, in order to prepare for the following phase.
Ball Driving: Phase 3 and 4:
On the start of the third phase, a message warns “The number of Power Grids have increased.” Unlike phases 1 and 2, phases 3 and 4 now spawn pairs of balls. These pairs will always be located at opposite corners of the room. The chart below will indicate which ball spawns at which port.
Ball
Spawn
1 and 2
1 and 3
3 and 4
2 and 4
5 and 6
1 and 3
7 and 8
2 and 4
In these phases, you have approximately 1 minute and 40 seconds to fill up all 8 port holes, or else the boss will overheat and enrage. He will enter scorching hot after 1 minute instead of 2 during these phases. Acrimor can also perform his jump rotation twice in a row, so be prepared.
On completing the 4th phase, a message warns “The Power Grids are not generated anymore.” No more balls will spawn, but people will still be generating Fevered stacks and Acrimor can still overheat and enrage, so this final trek is a DPS race.
Normal Mode Differences:
- Acrimor does not soft enrage, removing the need to root and drive.
- Acrimor jumps roughly once every minute and a half. However, completing a phase will revert that time back to 35 seconds.
- Only one ball spawns for each phase.
- Fevered debuff does not stack passively, only when getting hit by his flame attacks.