

Irontech Forge
By: Litewarior
Corrections by Shadovv
GIFs by Seaz Master
Requirements to access: Complete Act 7, Chapter 11: The Grand Enchantress
Gear Recommended: Stage 10+ Baleful/Seraph, Oath Necklace, 8 Midnight Skypetal Plains Soul Shield, Awakened Xanos Earring. (About the same gear level as Sanctum)
The Approach:
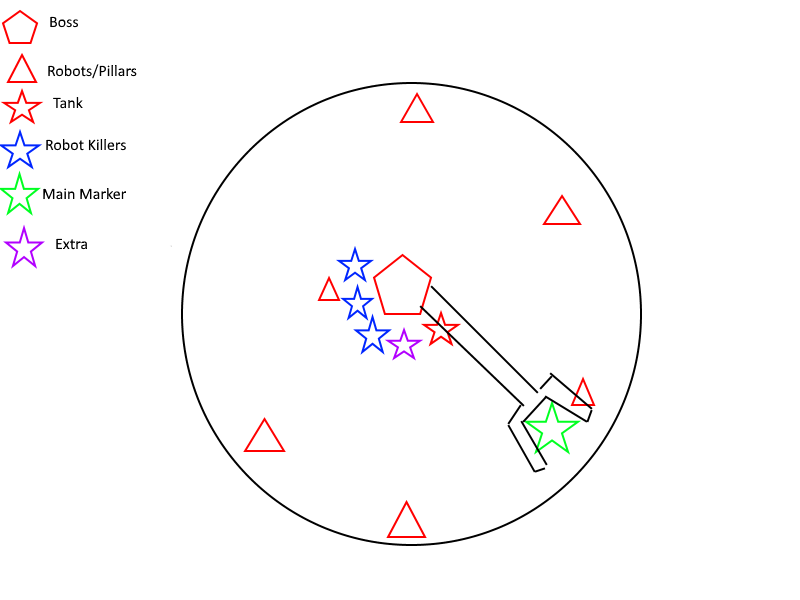
At the start, glide over the mobs. You will encounter patrolling Alarmotrons, if they get close to you they will wake up turrets that will shoot missiles at you that don’t knockback but deal a lot of damage.
Avoid the patrolling robots and kill everything in your way until the first boss.
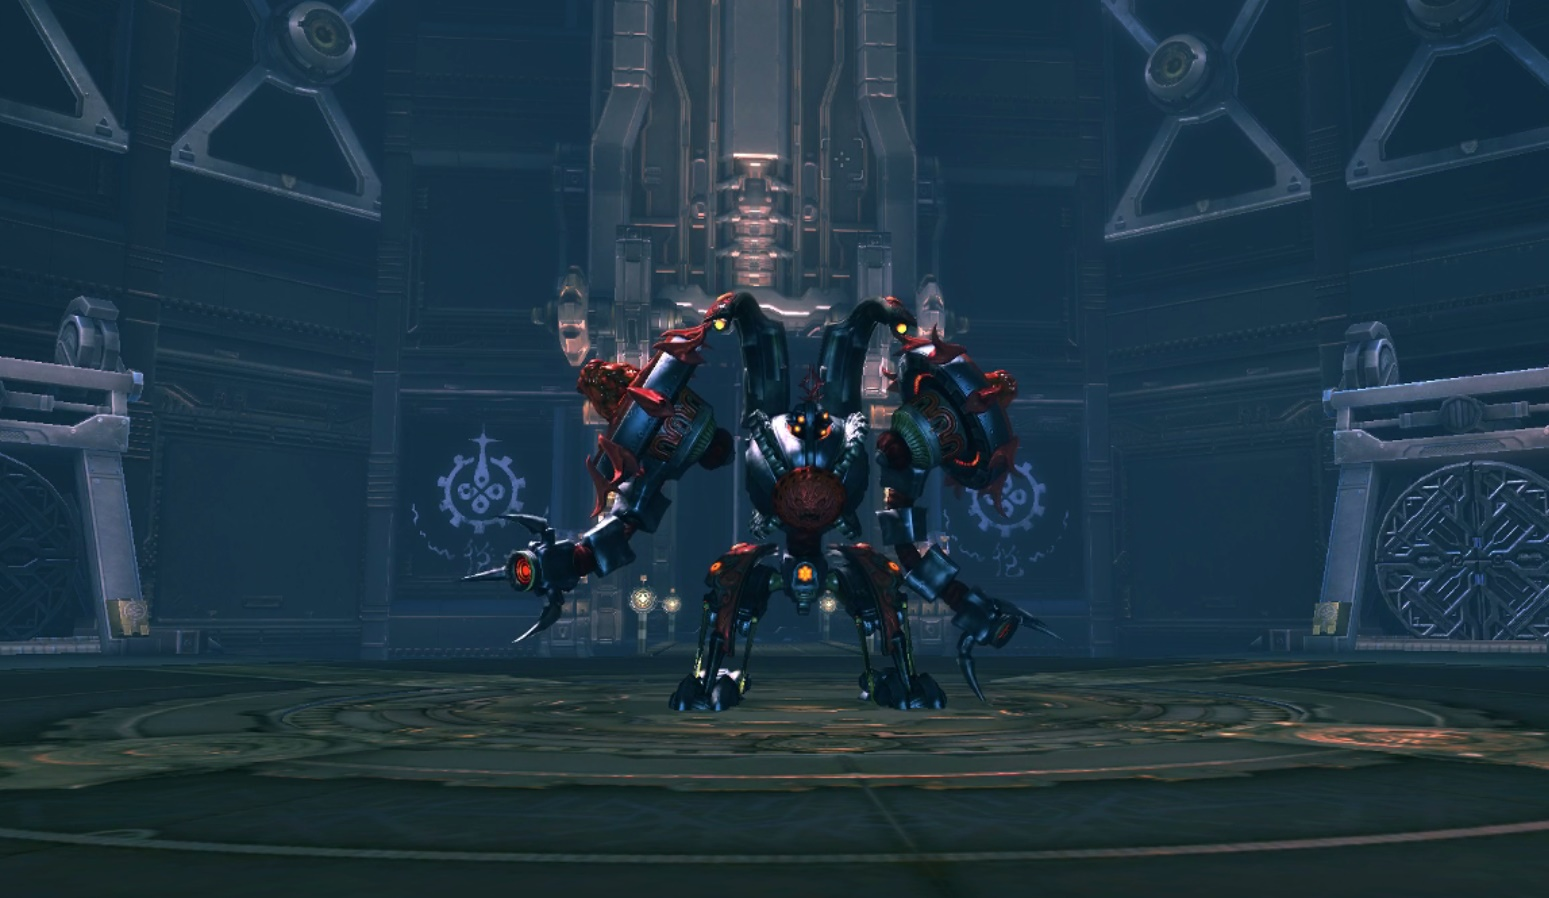
Iron Monkey:
Normal HP: 99,220,000
Hard HP: 180,400,000
Enrage: 7:20
CC: 4x
Roles:
- Tank
- 2-3 Robot Killers
- 1 Main Marker (cannot be the same as a Robot Killer or Tank)
- 1 Secondary Marker (cannot be the same as Main Marker, tank recommended for this)
Staff Slam: Spins his staff before slamming it down in front of him, knocks down if hits (blockable)

Jump Slam: Jumps before slamming the base of his staff on the ground, stunning in a circle near him (unblockable)

Front+Rear Slam: Slams in front of him, then behind him, knocks down if hits (blockable)

Spin: Spins his staff above him before knocking up everyone around him and spinning around his staff constantly knocking everyone near him up. The entire attack is blockable, but a single hit will knock you up.

Jab: Jabs his staff in front of him, knocking back anyone hit. (blockable)
Rotation: Staff Slam -> Jump Slam -> Front + Rear Slam -> Spin -> Jab
If the tank stands 9 meters or farther away, Iron Monkey jumps at them, producing an unblockable area of effect slam.
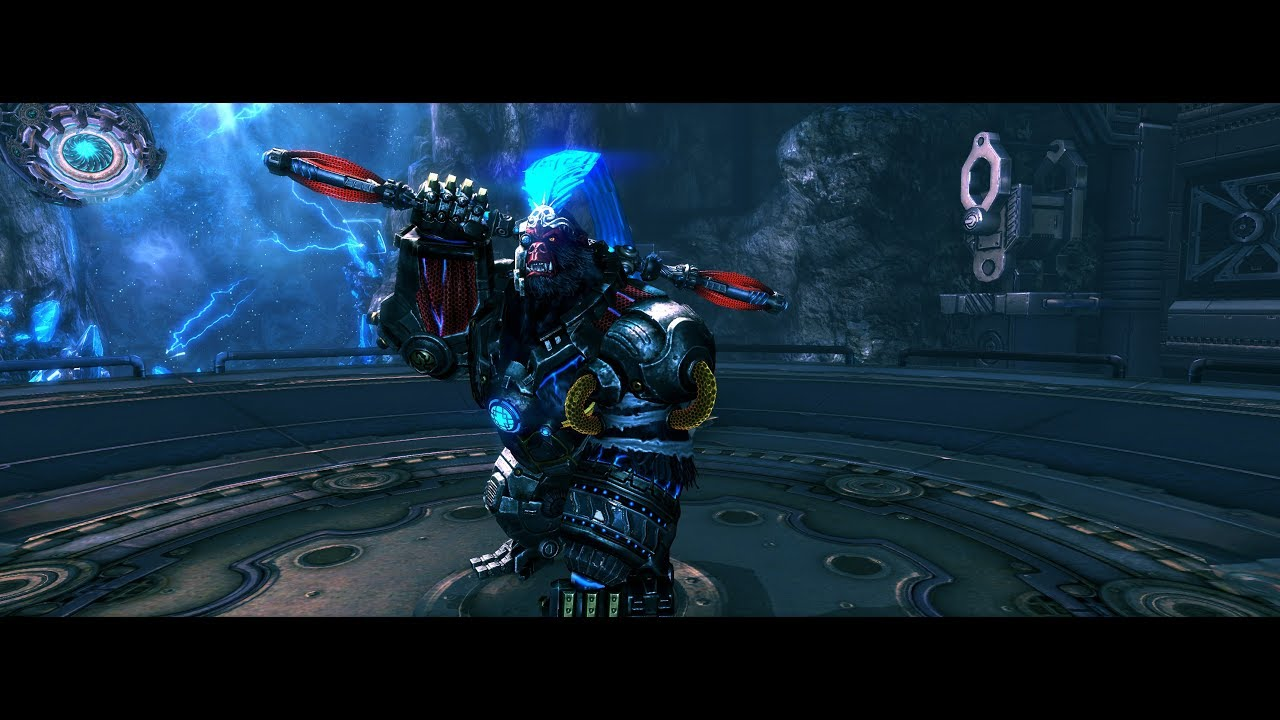
Special Phase 1:
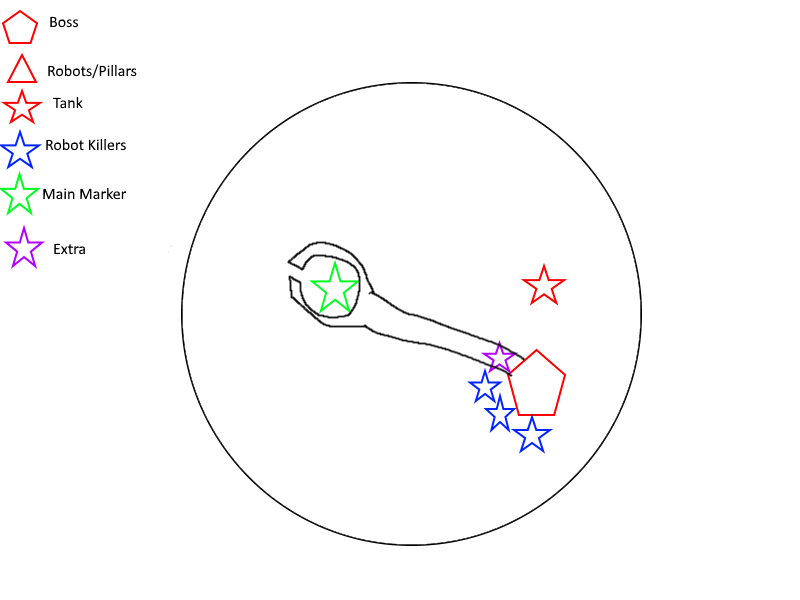
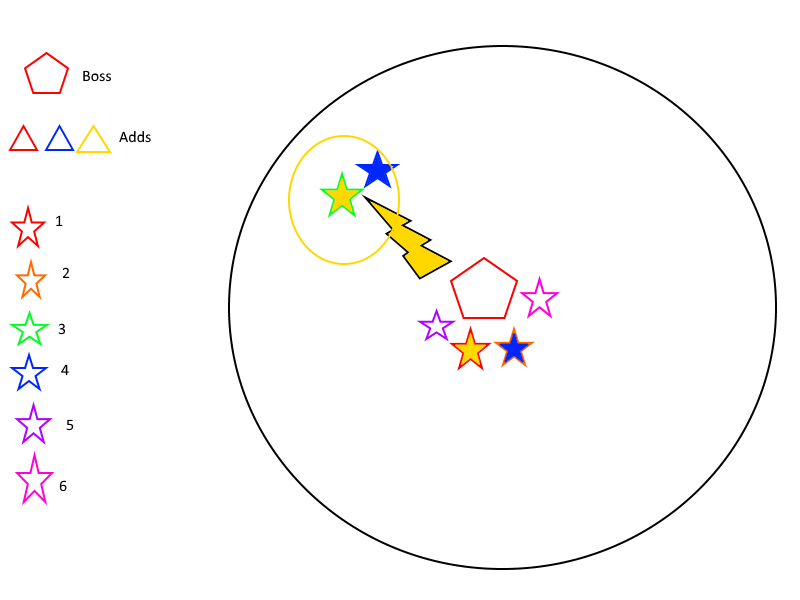
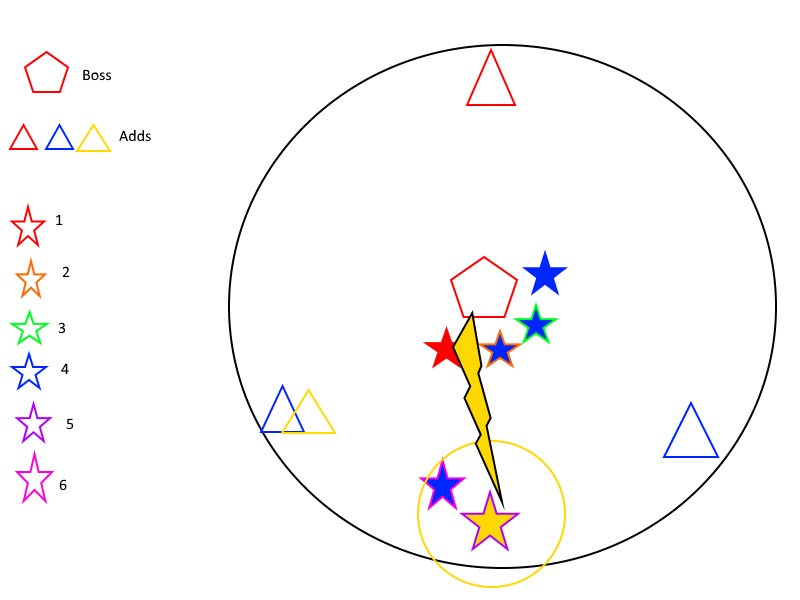
After some time (during his second rotation), he will jump to the center (does no damage), and a message warns “The Iron Monkey is activates the Powertrons” and summon three Powertron robots at the 1:30, 6:00, and 10:30 positions, and shoot lightning at the farthest person, this should be one of the robot killers, and all the other robot killers should be near them. The Powertrons will be trying to give the boss an electric pulse that restores 2% of his health, and will continue to do so until they die.

The lightning will bounce to up to 3 people, giving a stack of “Electric Surge” to each person, increasing their movement speed and letting them do massive additional damage to the robots and the boss. If there is two people, it will bounce back to the initial person, and if there is one person it will just give them three stacks.
Each person with one or two stacks will deal massive additional damage to the robots, but three stacks will transform the electric buff into “Jolt”, where they will not only do any additional damage but also die when it expires after 30 seconds. Make sure you share the lightning to kill the robots quickly.
After shooting the lightning, the Iron Monkey will beat his chest and roar, doing massive damage to everyone in the room, and is unblockable. A party iframe should be used for this.
After the roar, the Iron Monkey will look around as if he is searching for someone, marking the tank with a 5 second time bomb, and then jumps to the farthest person, knocking down anyone hit by the jump in an unblockable area of effect. This time bomb does minimal damage, but will instantly kill anyone with Electric Surge or Jolt.
The tank should stand at the edge of the room, away from any robots to lure the jump. The tank must move away from the boss very quickly after the jump though, so the robot killers don’t get hit by the time bomb.
After the jump, Iron Monkey will grab the farthest person and try to slam them and kick them across the room. This causes aggro drop to whoever is grabbed, make sure this is not the tank. He must be 4x CC’d to stop this.

After the grab, the Iron Monkey will resume his normal attack pattern.
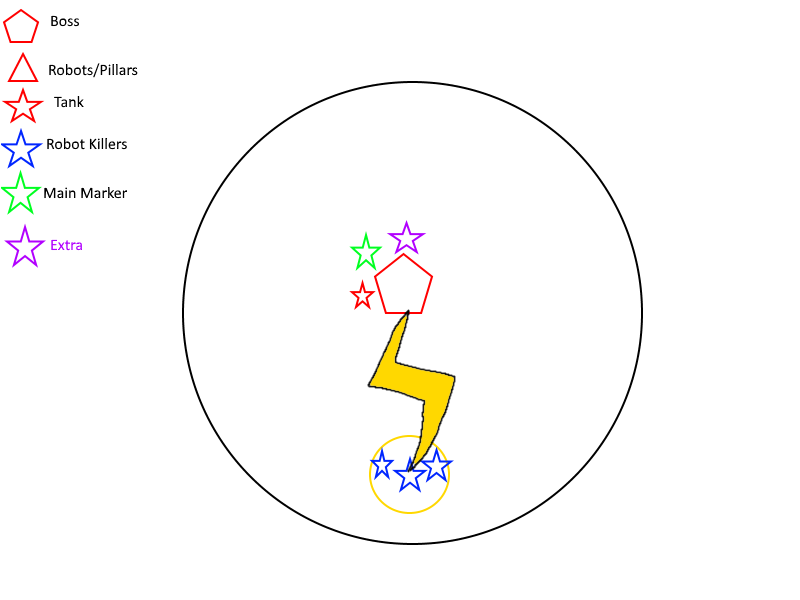
Special Attack 2:
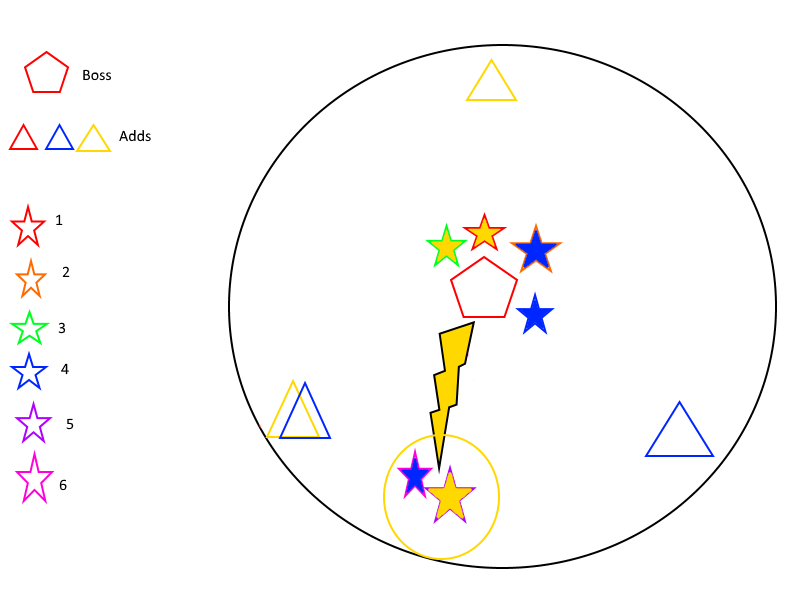
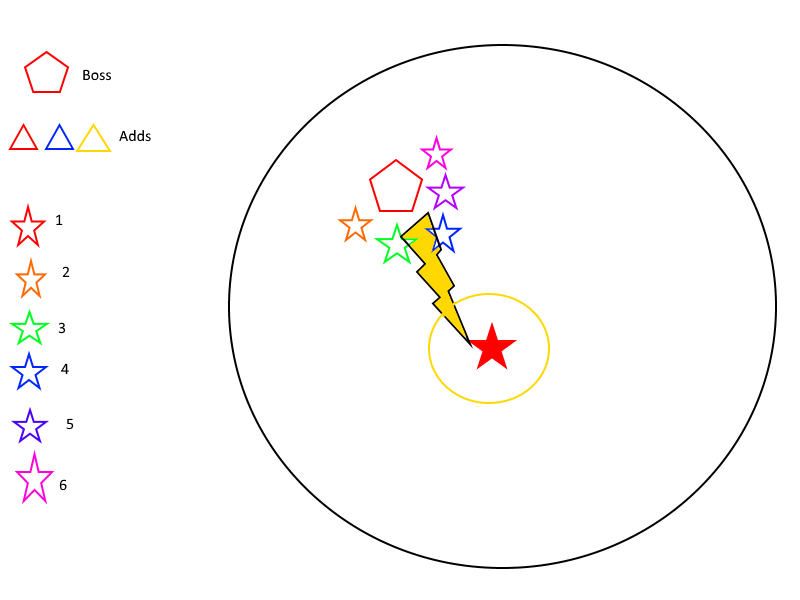
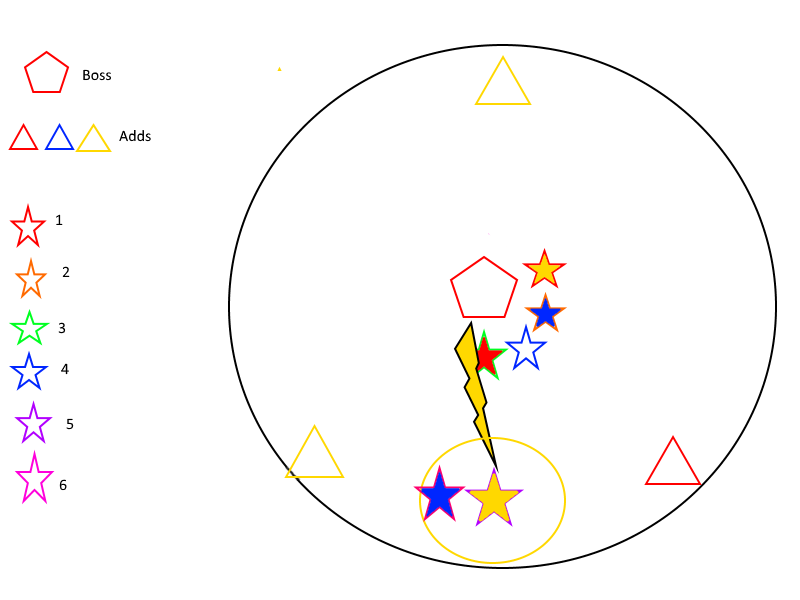
About one full rotation after Special Attack 1, Iron Monkey will jump to the center again to start special attack 2. He will shoot lightning at the farthest person again, but this time only the main marker should take it in order to get Jolt. This cannot be a Robot Killer as stacking Electric Surge on top of Jolt results in instant death. He will mark the tank with a time bomb again, before jumping to the farthest person, this should be the main marker.

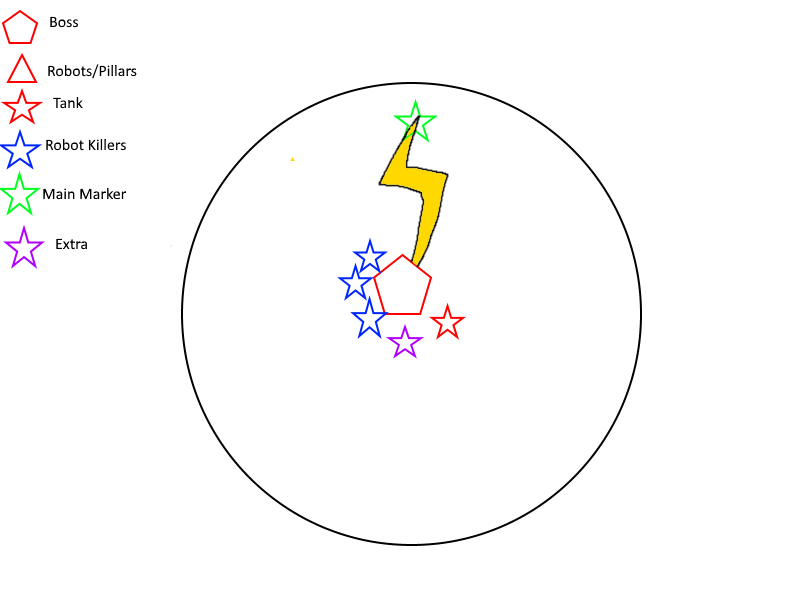
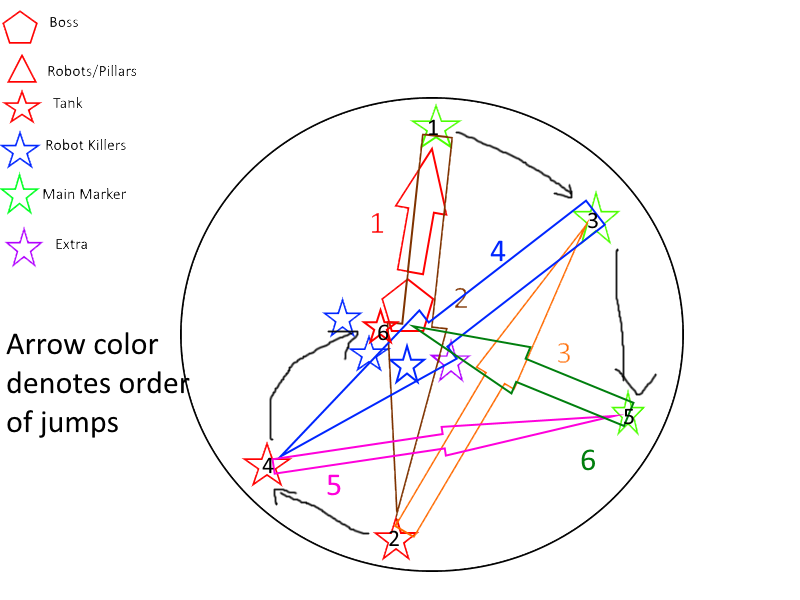
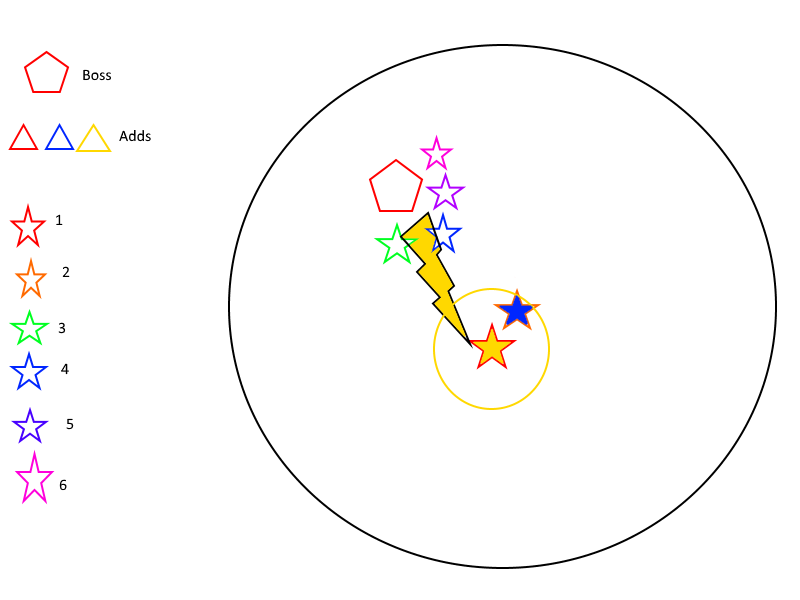
When he jumps to the farthest person, he will leave a metal pole in the ground. The pole will shortly pulse a 10 meter area of effect that instantly kills anyone with Electric Surge or Jolt. He will then jump to the farthest person from him at that point (secondary marker), and leave a pole in the ground there too. He will repeat this a total of 6 times, with no pole on the final jump. Each pole should be at least 10 meters away from each other; if they are too close, they will explode and cause a wipe.

The jumps will knock down, be sure to iframe them or use a dash skill.
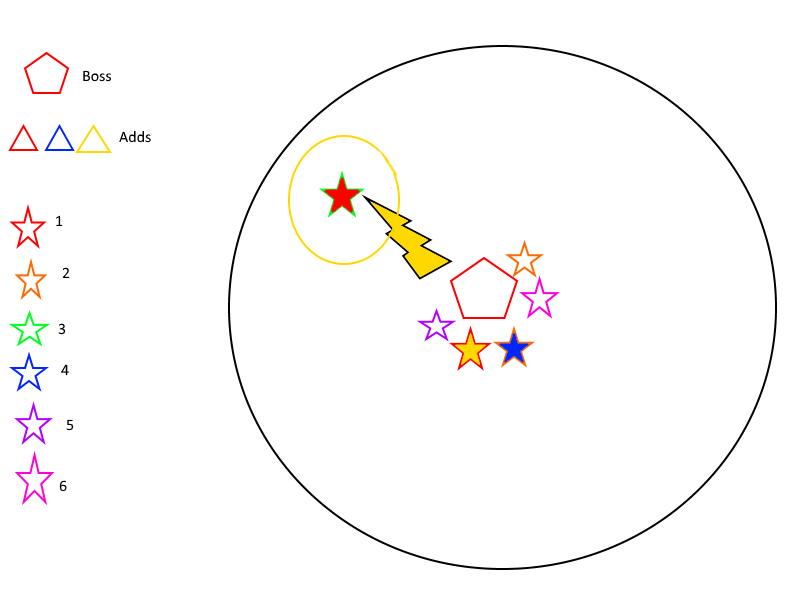
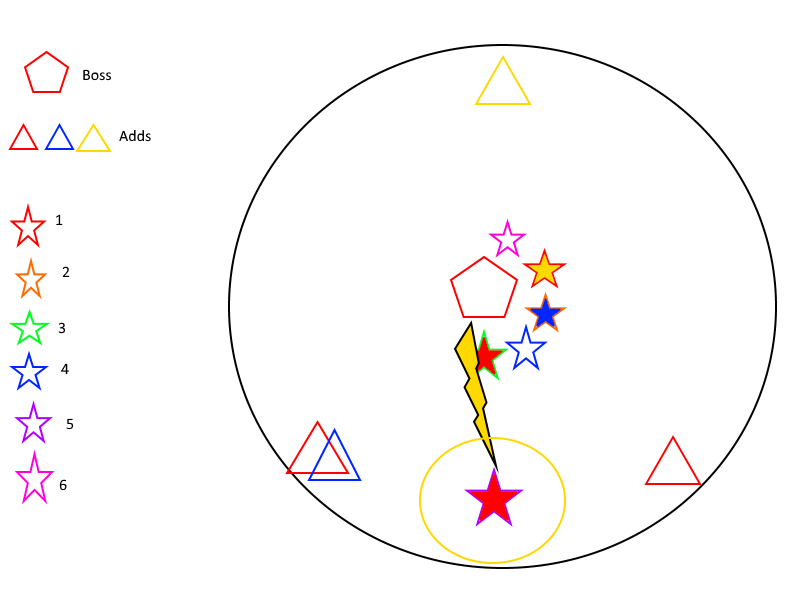
After 6 jumps (last jump should be on the secondary marker), the Iron Monkey will grab the farthest person from him (should be main marker) and try to electrocute them. If they have Jolt, the debuff will be removed and inflict 12% HP damage to Iron Monkey and daze him for a few seconds. If they do not have Jolt, the grabbed person will die.
After the grab, the Iron Monkey will resume his normal attack rotation, and repeatedly do the special attack phase until he is dead.
Normal Mode Differences:
- Instead of the mechanic phases being time based, he will do Special Attack 1 at 70% and 30%, and Special Attack 2 at 65% and 25%.
Same as the first, avoid patrolling robots and kill everything in your way. There is a miniboss in between the corridors.
Suguri:
Normal HP: 13,915,000
Hard HP: 25,300,000
Enrage: 3:30
CC: 2x
Suguri fights identically to Iron Juggernaut of Desolate Tomb. At 80/60/40/20% HP, a message warns “Initiating Defense Protocol - STAGE 1/2/3/FINAL STAGE”, and he will dash to the middle of the room, become invulnerable, and summon two Guardotrons and two Mendotrons which will attack players and heal the boss respectively at the 12:00, 3:00, 6:00, and 9:00 positions. Kill these robots fast, starting with recovery to prevent healing, and he will drop down and become vulnerable again. If you push him past another threshold before he becomes invulnerable, he will skip that phase.
Yoong:
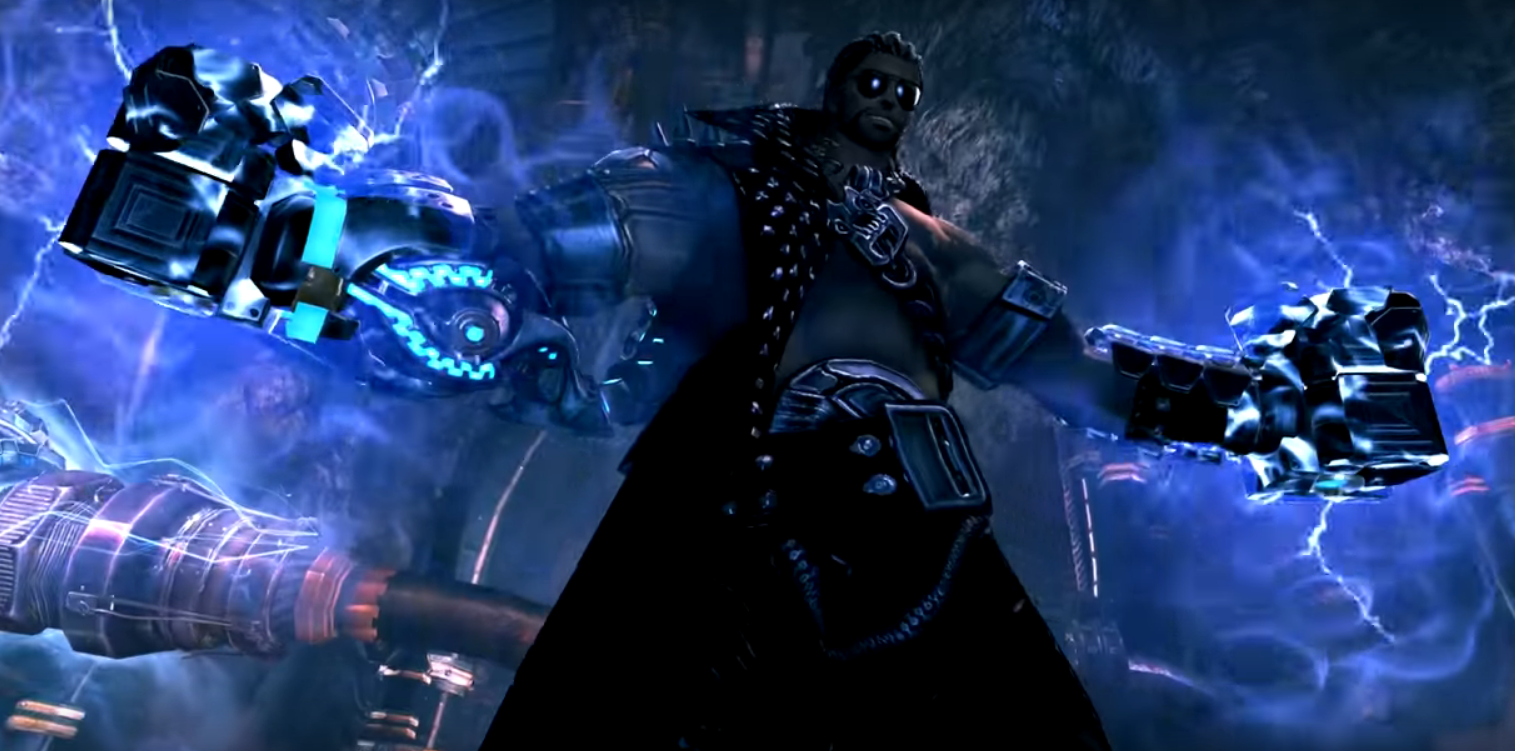
Normal HP: 96,030,000
Hard HP: 174,600,000
Enrage: 11:10
CC: 4x
Attacks:
Jabs: Two short jabs, then a 180 degree swipe with his right arm. All blockable, doesn’t cc.

Spin: Swipes in front with left arm, then spins damaging everyone within 8 meter, then spins again damaging and knocking back everyone within 15 meter. Each hit is blockable. Getting knocked back by this attack can mess up the marking, so make sure to block or iframe the last hit.

Uppercut: Dashes behind the tank, then spins his arm and does an uppercut hitting 8m away, dealing massive damage and knocking up. Cannot be blocked.

Double Punch: Yoong rears back, then does a massive punch towards the tank, followed by one behind him, dealing massive damage and knocking back anyone hit. Unblockable. Getting knocked back by this attack can mess up the marking, so make sure to block or iframe the last hit.

Yoong doesn’t have a set pattern, other than he will alternate jabs between each of his attacks. If he does Double Punch into an Uppercut, he will not do jabs or a dash.
If the tank stands 9 meters or farther away, Yoong fires 6 projectiles in the order of who hit him since engaging. If the tank is still too far, Yoong dashes behind them.
Color Mechanic:
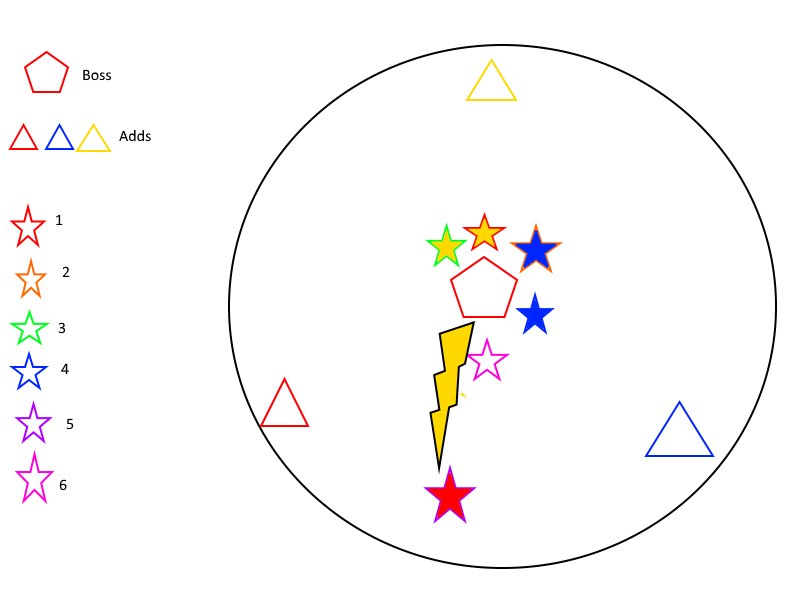
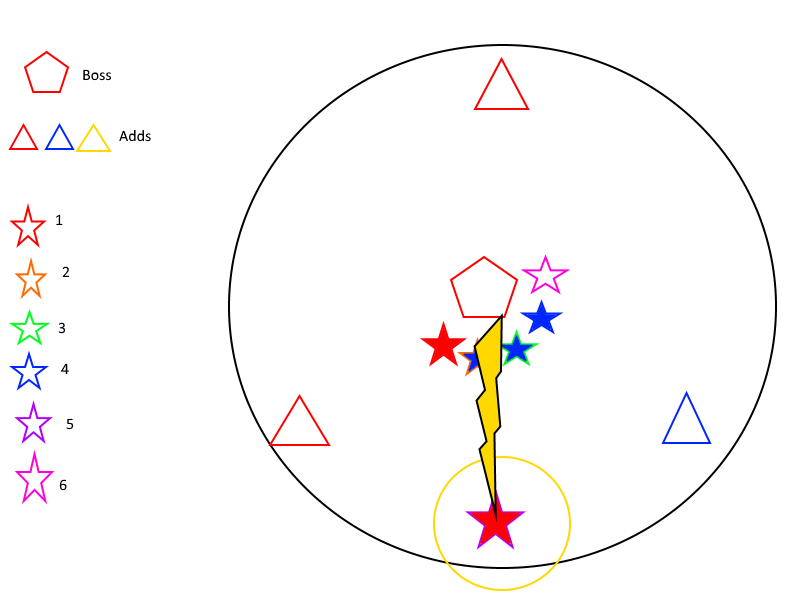
Yoong has 3 phases, and during each phase he will cast 3 chain lightnings, summon 3 colored adds around the field, at 4:00, 8:00, and 12:00, and give himself 2 colored shields during each phase, the first one after the first chain lightning and the second while the adds are up. The colors depend on the phase.
Shortly after the fight begins, a message warns “Yoong activates the Security System” and the floor panels in the corners of the room will light up either blue, yellow, or red. These are where the three adds will spawn.
After a series of normal attacks, a message warns “Yoong initiates a Phase Shift” and Yoong will jump to the farthest person from him, and then shoot lightning at the next farthest person. This lightning can bounce, just like Iron Monkey’s, and will give a color buff to each person based on how many times it bounces off of them, as well as a debuff or buff based on the color. The distribution of colors you want depends on the phase.
1 Bounce = Blue Phase Protection, deals damage over time
2 Bounces = Yellow Phase Protection, reduces Recovery
3 Bounces = Red Phase Protection, increases Attack Power

About 30 seconds after the first lightning, a message warns “Yoong activates his Shield” and he will create the first shield around himself, if you hit into this without the same colored buff you will take damage. Ten hits from the person with the same colored buff will remove the shield. If the shield is not broken after 15 seconds, Yoong will absorb the shield and heal 5% of his health, and gain a stack of “Absorb Shield” which increases his damage; on 3 stacks he will enrage and wipe the party.
After creating the shield he will do his Double Punch, then he will lift his fists into the air and drop pits of electricity around, causing damage and knockdown. He then does a vacuum into a powerful slam, CC this.

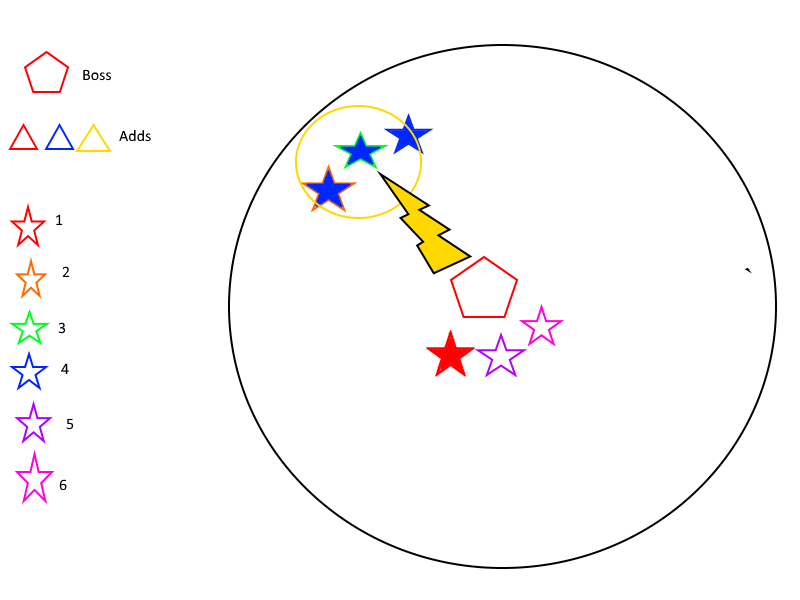
He will resume his normal attack pattern for a short while, before doing a second jump and lightning. This will be followed immediately by him shooting a persistent circle of electricity at the farthest person, and another chain lightning without the jump. Afterwards, a message warns “Yoong summons the Titans” and three colored clones of himself will spawn.
The clones must be attacked by the person with the same Color Phase Protection buff as their color. If they are attacked by someone without the corresponding color, the attacker will receive damage and the clone will gain a 5 second “Phase Protection” buff which reduces the damage they receive by 75%.
After the adds spawn, a message warns “Yoong selects a Target” and he will mark the closest person, dash to them and punch them which will stun, and do a Double Punch. Yoong will then focus all his attacks on this marker for a while, regardless of whoever has aggro; make sure the tank receive this.
As one of the adds is random colored each phase, you cannot fully plan out every phase in advance. Generally, people are assigned roles based on position in the party, 12/34/5(6). They can be assigned however necessary though, the tank should be given the color needed to break the second shield if possible.
Phase 1:
Adds: Blue + Yellow + Any
Shield 1: Blue
Shield 2: Yellow
First lightning: 1 + 2 share
Second lightning: 3 + 4 share
Third lightning: If the random add is red, then 5 takes alone, otherwise 6 shares.

Phase 2:
Adds: Blue + Red + Any
Shield 1: Red
Shield 2: Blue
First lightning: 1 takes alone
Second lightning: 2 + 3 + 4 share
Third lightning: if the random add is red, then 5 takes alone, otherwise 6 shares
Phase 3:
Adds: Yellow + Red + Any
Shield 1: Yellow
Shield 2: Red
First lightning: 1 + 2 share
Second lightning: 3 takes alone
Third lightning: If random add is yellow, 6 shares with 5, otherwise 5 takes alone.
If marking is messed up and you are missing a color, using a persistent iframe such as Blade Master’s Winged Protector can allow you to kill the adds without taking damage.
The adds will try to do a special attack based on their color, and they become CC’able when they start the special attack.
Blue - Drop persistent lightning circles
Yellow - Shoot ranged attack
Red - Vacuum
The blue and yellow ones aren’t very important, but make sure to 2x CC the red add’s vacuum.
When the adds do their special attack, the boss will put up his second shield. Whoever has the correct color should hit the boss until the shield goes away, then go back to their add. Yoong will do his electric pits attack again several seconds after he makes the shield.
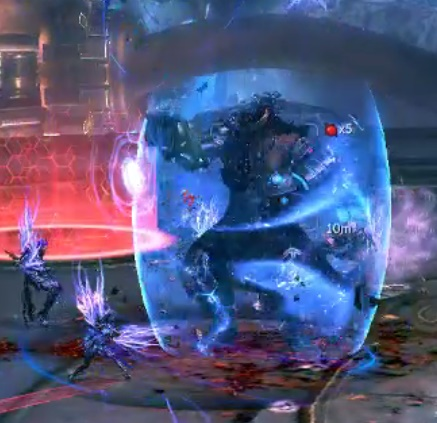
Once all the adds are at 1 HP, they will explode and everyone will gain the “Self-Defense Chi” buff for 60 seconds. The explosions will not be simultaneous. Force Master’s Frost Sheath or Destroyer’s Iron Plating should be used for the explosion, and everyone should wait until all three adds have exploded before breaking sheath.

20 seconds after Yoong summons the shield, a message warns “Yoong unleashes a Havoc Attack” and he will perform a room-wide slam. If the adds are not dead, then this will be an instant wipe. If the adds are dead, the Self-Defense Chi buff will protect you and then grant you 150% Attack Power and 150% Critical Damage for 10 seconds. He will be exhausted for several seconds after performing Havoc Attack.

When he recovers, he will lift his hands above his head and groan, before slamming them down and create a slowly expanding ring, iframe or jump over it.

He will then shoot an electric circle at the three farthest people, dash behind the tank, and do one of two attacks:
One is a martial dance, where he dashes and punches to the 5 closest targets sequentially, and uppercutting the last person, each hit does significant damage, but are all blockable.
The other has Yoong slamming the ground 5 times, each area of effect expanding in size and damage, and is unblockable. Either have Blade Master’s Winged Protector or Blade Dancer’s Maelstrom up, or just run away from Yoong.

Once he finishes the special attack, he starts the next phase and resumes his normal attack pattern.
Normal Mode Differences:
- Yoong does not start the phases until 70% and 30%
- If he absorbs 3 shields, he heals 25% of his health but loses Absorb Shield stacks, instead of wiping
- Failing to kill the adds in time merely makes Havoc Attack deal significant damage that can be iframed instead of wiping the party.
Transcendence Engine
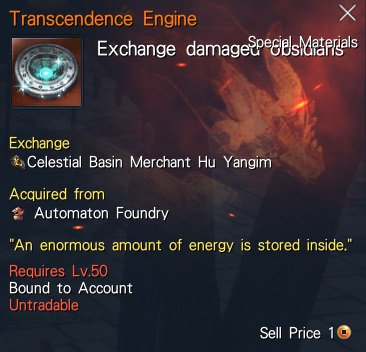
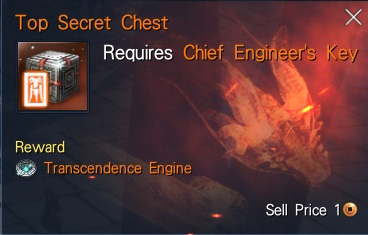
This is a rare legendary drop that can be traded along with 10 Void Fragments to the Celestial Basin trader for a pentagonal gem with 10 AP and 75 elemental damage of a specific element. There is also an extremely rare tradeable version that can drop.
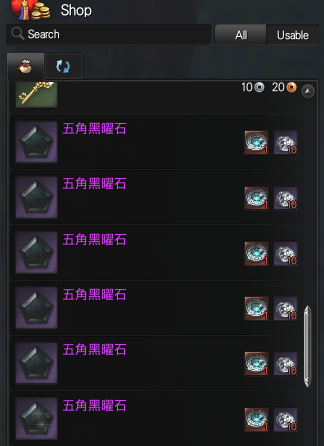
Obsidian Gem

This gem can be transmuted just like other gems with 3 of the immediate lower tier up to heptagonal.
Blackstone


These rocks are fairly common, and are used for evolving Raven weapon stage 7-9, Skyshatter Ring breakthroughs, and Awakened Skybreak Spire accessories. The daily for this dungeon give fragments, 10 of which can be combined into a single black stone.
Divine Grace Stone
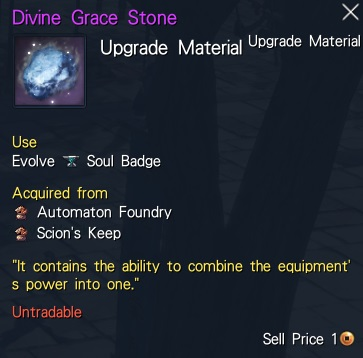
5 of these are needed to fuse Soul Badges, and they are an extremely rare drop from this dungeon.
Diabolical Relic Chest
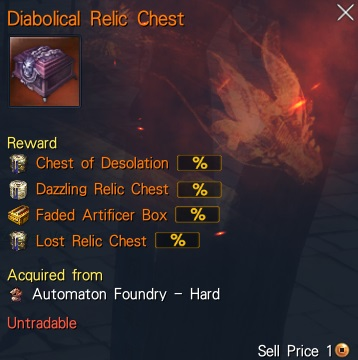
This is an extremely rare chance to drop, and can contain the tradeable version of the boxes containing the Oath Necklace, Destiny Ring, Eternity Belt, or Immortality Earring.