
Requirements/Recommendations:
- "Completion of Act IV: Chapter 10: The Gates Open
- Lost Hongmoon Secret Technique - Volume 2, Chapter 2 - Unlocks a Hongmoon Skill
- Volmie: Writer
- Shadovv: Corrections
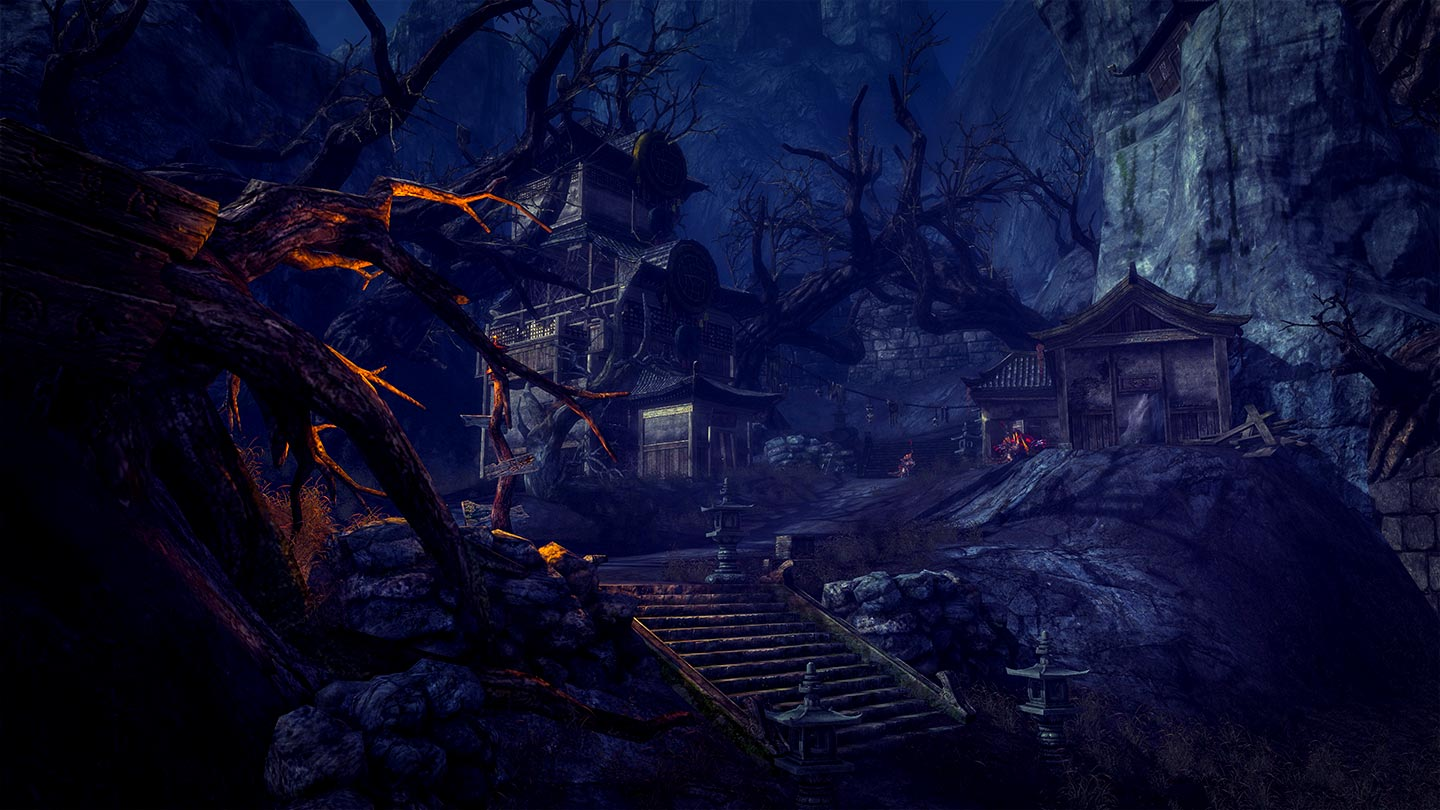
Entrance:
Before entering, there is a daily questgiver that asks killing 20 Bloody Jiangshi, 10 Stalker Jiangshi, and a Profane Jiangshi in the first area.
To begin your journey with clearing the Awakened Necropolis, you'll have to wallrun on the rock located on the right side from the entrance. If you don't have extended Windstride (Purification Jar quest), you may have to stop on the lower rock and wait a moment for it to recharge. This is done to avoid fighting the large groups of skeleton mobs between the entrance and the first boss area. From this location, you'll have to glide towards your first objective. In the air you need to follow the road shown on the mini-map, and stay focused as the invisible walls are close together and you may start falling if you bump into any of them.
Note:
For first timers, you'll notice a one-time quest, "Graveyard Party Favors", that requires you to kill additional monsters below the air path. This quest isn't required to progress the dungeon. Either ask your group beforehand to help you with killing those or visit the dungeon with a friend to complete the additional quest.
Profane Jiangshi:
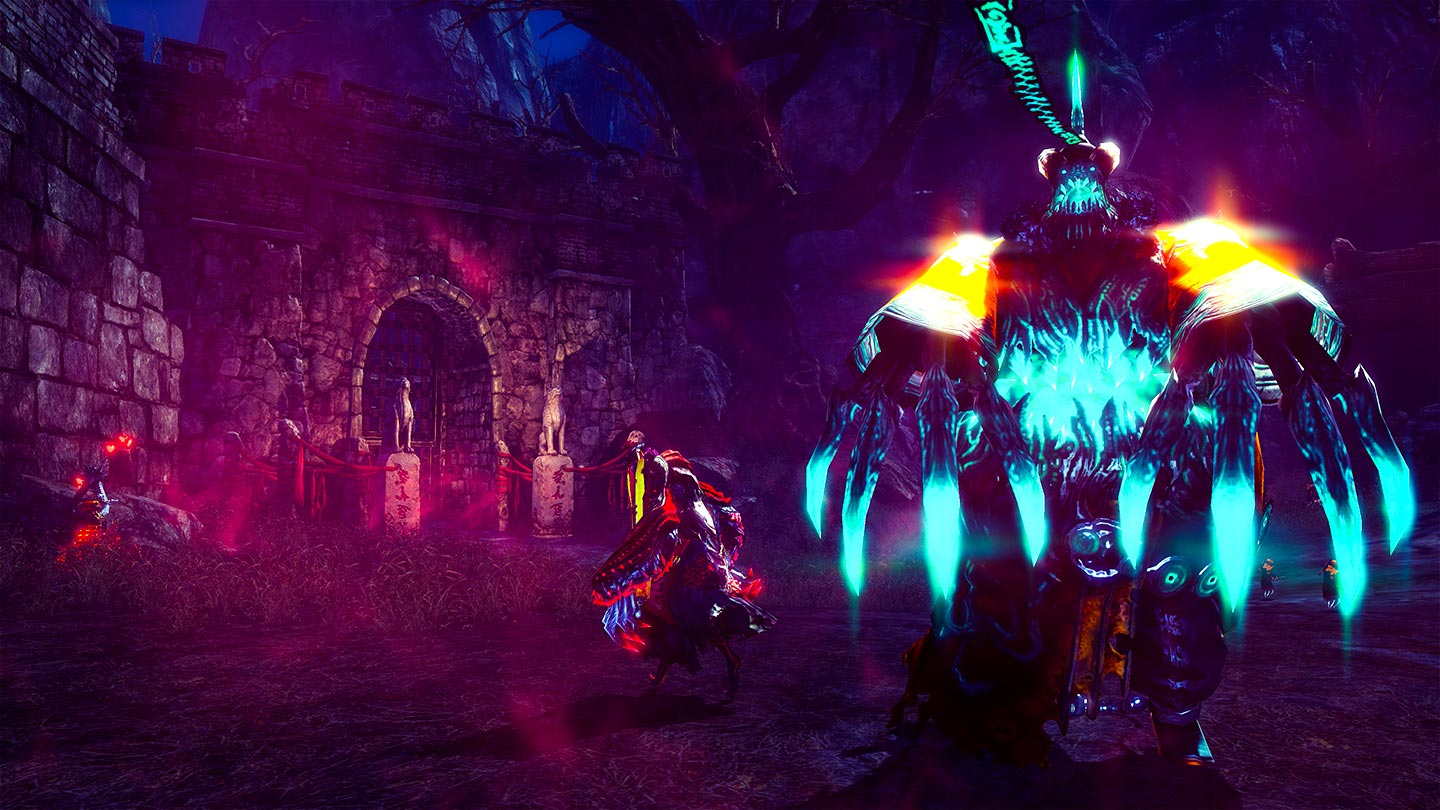
HP: 1,790,000
Enrage: None
CC: 2x
The boss here is similar to the Field Boss in the Highland Necropolis zone. It is recommended to clear the patrols of Jiangshi before starting the boss, as they will all swarm the tank or first person to hit the boss if left alive.
Attack Pattern:
- Targeted swipe, blockable.
- Frontal 180 degree swipe, blockable
- Frontal double swipe, blockable, failing to block or iframe this attack greatly reduces threat, making it crucial for tanks to not get hit by this
- Frontal two-hand uppercut, blockable, causes knockback and knockdown
- Frontal downward slap - Blockable
If the tank stands 9 meters or further, Profane Jiangshi jumps at them creating an unblockable area of effect slam.
Attack Pattern 60%:
At 60%, the boss will do a roar animation and its attack pattern changes with several new attacks.
- Frontal Phantom Grip in a large cone, unblockable and covers massive range in front of it.
- Fairly fast AoE roar, unblockable and knocks down, deals very high damage and has very little windup so be prepared to iframe
- Summons 4 zombie adds
- Long range frontal spit attack, blockable, causes knockback and knockdown.
- Phantom Grips the tank, if successful holds them in the air for a moment and drops them, blockable, causes daze.
- Targeted swipe.
- Frontal double swipe.
Demonseal Core:
There is a daily questgiver requesting the defeat of Lycan in this next area.
In the main Necropolis area you'll find three camps in which Demonseal Cores will spawn. To activate one of them, you must defeat the Pyre Lord guarding it's spot. These Pyre Lords cannot be stunned, dazed, knocked down or knocked back, however they are not immune to root.
Pyre Lord's attack pattern:
- Front Smack x2, blockable
- Double Smack, blockable
- Front Smack, blockable
- Long Charge AoE, indicated by red and black swirls around the Pyre Lord's hands, this AoE can blocked, but will do a large chunk of damage and knock you backward if not avoided. Charge time for this attack is roughly 3 seconds.
If the aggro holder stands 4 or more meters from the Pyre Lord, it will do a frontal unblockable Phantom Grip before throwing its victims away and deals very high damage.
Defense:
Once the Pyre Lord is dead, the defense portion begins. 3 Snapjaw Shaman NPCs and a Demonseal Core will spawn, the Shamans will slowly heal the core, and you must defend it from waves of mobs with additional NPCs helping you defend the Shamans. The three cores are Soul Ward, Snapjaw, and Bloodscale, and in order to progress to the final boss all 3 of these cores must be healed completely by the Shamans. Once all 3 cores are fully healed and active, typically after around 6 complete waves of mobs, the dragon pulse to the final boss opens in the middle of the map in front of the Sealed Palace.
Enemies will start to pour in and attempt to destroy the core; if it dies the Pyre Lord respawns and must be killed again to restart the defense processes. There are six waves of enemies in total.
Enemies include:
- Phantom: Rushes to the Shamans and self-destructs, creating an AoE that causes movement speed reduction and deals very high damage. The defense NPCs will never directly target these, and so should be prioritized above all else.
- Bone Ebonfiend: Standard melee enemies, although they have no special qualities.
- Corpse Fiend: Slightly stronger Bone Ebonfiends but still of nothing noteworthy.
- Flying Fiend: Attacks at range and is immune to knockdowns.
- Fiendhounds: Summons 2 zombies but does not attack itself.
- Hulking Fiends: Stronger melee enemies with 2x CC bars. Appears in later waves.
The defense portion is relatively straightforward, send 2 people to each core, with the 2 at Snapjaw dealing with killing the roaming Lycan boss while still defending their core.
While defending the cores there are two things to keep in mind, the first being to keep your eyes open for various Pot Dogs that will spawn at the beginning of each wave, when they are killed they drop either a box of bombs, a rifle, or a flamethrower, and these items can be very helpful in dealing with the waves of attackers.
The second thing to remember, and the most important, is the priority in which you should kill the monsters attacking the core. In order of importance, Phantoms > Flying Fiends > Fiendhounds > Hulking Fiends > everything else. It's also important to remember that while the NPCs assisting you are not by any means weak, but they cannot defend the core on their own, and they will almost always completely ignore Phantoms, which coupled with the fact that they explode and deal significant damage is why you want to kill them as quickly as possible. If you're unable to kill them before they explode, which is shown by a countdown above their head, do your best to avoid the damage from the explosion.
As soon as the 6th wave is complete, it will reset back to the 1st wave and continue to pour enemies. Even after the core has been fully healed, it will kill the existing enemies but reset back to the 1st wave. The Shamans will leave a fully healed core, meaning that there is no one to heal it should it be damaged. The waves will only stop once all three cores have been healed, so do not leave your post until then.
Lycan:
HP: 1,280,000
Enrage: None
CC: 2x
This boss patrols the main Necropolis zone in a counterclockwise motion starting from the top left. It is very similar to the field boss from Lilystalk Tradepost.
If all 3 Demonseal Cores are active, Lycan will despawn.
Attack Pattern:
- Targeted swipe, blockable.
- Rears back and pounces the ground in front of it, blockable, causes knockback and knockdown.
- Targeted swipe.
- Gathers electrical energy and discharges it in an AoE, blockable, causes knockback and knockdown.
- Jumps on the tank, creating an AoE impact on landing, blockable, causes knockback and knockdown.
If the tank stands 9 or more meters, the boss jumps at them, creating a blockable AoE impact.
Scorpion Queen:
HP: 2,630,000
Enrage: 3:05
CC: 2x
Attack Pattern:
- Targeted pinch, blockable
- Sweeps her claws inward then outward in a 180 degree motion in front of her, both hits are blockable, causes knockdown on the second hit
- Targeted pinch
- Jumps and smashes her claws in front of her, causes knockdown.
- One of the following:
- Stabs with her poisonous tail in a line, blockable.
- Raises herself on her tail briefly before doing a single spin, blockable, causes knockback and knockdown.
- Stabs with her poisonous tail in a line, blockable.
If the tank stands 9 meters or further, she will Phantom Grip the tank and hit them repeatedly, dealing very high damage.
Nightmare Wave:
After a minute and 15 seconds into the fight, a message warns “Scorpion Queen is preparing to cast Nightmare Wave” and she will dash to the center of the room and create a small damaging AoE impact there. She will then balance herself on her tail and slam her body into the ground, creating a field-wide unblockable AoE. There are two sets of three slams; the second slam is immediately after the first, while the third slam is delayed. Each slam does a very high amount of damage and causes knockback and knockdown.
While you can iframe each slam, there is a mechanic that helps alleviate the damage. Throughout the fight leading up to the Nightmare Waves, small scorpion adds will spawn around the area, indicated by poison pools forming on the ground. When killed, they provide a stacking defense buff for 10 seconds and greatly reduces the damage done by the Nightmare Waves and prevents the knockback and disable effects they would normally cause.
In order to have these scorpions available for the Nightmare Waves, a ranged character should attack them once with a low damage attack in order to get aggro on them and then kite them away from the rest of the group until they are needed so that they do not die. When the phase begins the scorpions should be killed one-by-one ideally right before the first slam hits to maximize the time the buff is active.