
Fair credit attribution: This is a more detailed, expanded written version of the video guide made by LucidDream, aka Licod Games.
Dreamslayer, the author, extracted highlights from the video, but also added additional information, clarifying notes, rotations, and attack descriptions and gifs from the video. .
Original video can be found at the following link:
Hollow’s Heart is quite involved, and will require good party coordination and/or communication in order to clear. The mechanics are heavily reliant on a couple of players for each battle.
Boss 1: Jurupo (Enraged Branch)
HP: 105,734,000
Phases: 70%, 40%
Standard Rotation:
Pierce Claw → Triple Spin → Skyward Swipes → Downward Cleave(Unblockable) → Dark Decapitation (every 3 Downward Cleaves)
Roles:
Four markers, preferably ranged but any class can do. If not ranged, lowest dps melee should do it. One Tank, should stay in melee range for the fight.
Notable Attacks
Triple Spin(blockable)
The boss will ignite both of its claws with energy and perform a slow spin slice. It will then spin back the other way more quickly performing three slices at a faster pace. Block, iframe, evade,or SS back and wait it out. Do NOT party iframe any of its regular attacks.
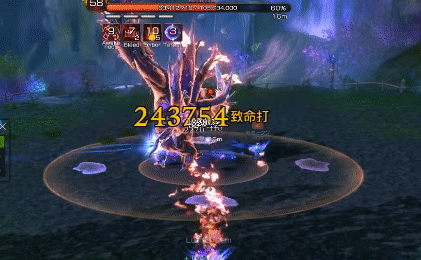
Dark Decapitation(Unblockable, Potential CC cancel, Total Party Kill if failed on Hard)
After the boss performs three rotations and approaches a phase boundary, it will perform a roaring animation and generate a dark aura underneath itself. This dark aura grants a buff to the bossthat prevents CCs from being applied as long as the boss stands within it, and will root players if touched.

The boss then jumps to the farthest person, emitting an extremely fast-moving kd shockwave when landing, then makes another dark aura. He then charges back towards the first AoE, and his charge must be blocked before he reaches the first AoE but after he leaves the second one. If blocked, or if he reaches the first, he will attempt to wipe the party and must be CCed out of the attack.

If he reached the aura, he’ll be immune to CCs and thus will successfully wipe the party on Hard, or will require an iframe on Normal.
Generally, Marker 1 will lure the jump. After 40%, he will jump twice, once to the farthest person, then again to the farthest person from his new position.
Mechanic Phases
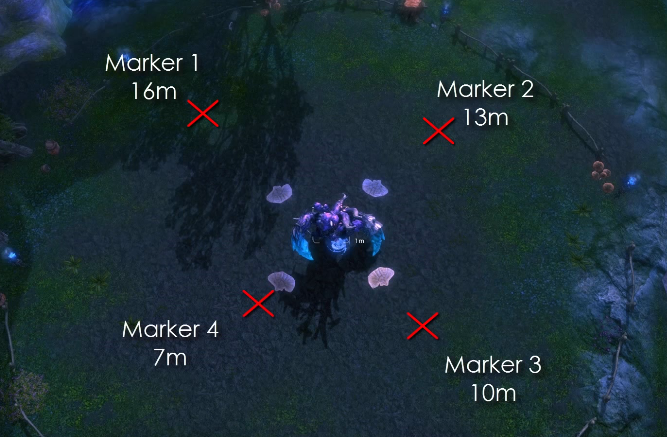
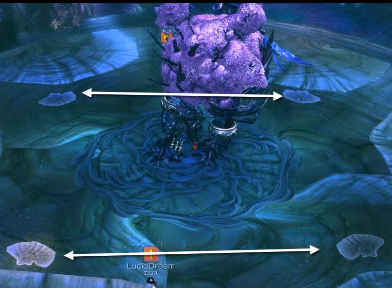
In each phase, the boss jumps to the center of the arena and marks the four farthest players, in order from farthest to nearest of the four. On 40%, it will also release two dark balls that must be blocked; if touched, they apply a root. After that, it will follow up with 5 rapid room-wide AoE shockwaves that can be jumped over. If hit, you will be knocked back. The boss will then perform a Decapitation, a room-length conal AoE centered on each marker, in order of the marks.

On Normal Mode, this can be iframed, but is an instant kill on Hard Mode. The marks need to be spread out at the four corners of the room so that the waves do not kill the party or other marks, and they have time to rotate away from the waves. The one being targeted for that particular wave is immune to the instant-death effect, but still needs to iframe the attack. Use the four shells on the ground near the boss to line up the four marks, and position appropriately according to the image below.
After the fourth cone, the boss will attempt to use a room-wide instant kill, Mass Decapitate. It must be CCed out of it to prevent party wiping, but the attack can be iframed on normal mode if necessary. However, the dark buff will prevent fast ccs, so wait for it to expire before ccing the boss. After this, the boss will perform a 4-hit knockback AoE wave which must be party protected/iframed. Sheath is the best option.

Boss 2: S. Spider
HP: 113,100,000
Phases: 80%, 40%
Roles:
Marker, Dealer
Boss 2 is the easiest of the three bosses. Watch out for poison stacks, don’t let them get too high, and you’ll be fine for most of the fight. The poison stacks can be cleansed, so bring techniques that have that capability. The mechanics for this battle are fairly straightforward.
Mechanic Phases
The boss will jump to the center of the room and zip to the ceiling and become untargetable. The Marker needs to stand directly under her as she is entering the ceiling, as she places a mark on the closest person to her after getting into position. A spider icon will appear above the head of the Marker if they’ve done it correctly.

Spider eggs will spawn at the corners of the map. Each egg has 67,860 HP and should be destroyed quickly by all other players. The boss will then spawn many spiderlings who will all chase after the Marker. One of the eggs, randomly chosen each time, will have a Little Bomb Spider (LBS) inside it. When killed, the LBS drops an orb which the Dealer needs to pick up. The boss will then grab the marker and attempt to instant kill them. The Dealer then throws the orb at the boss during this, which will free the Marker and cause the boss to fall from the ceiling. If the Marker dies before the boss attempts to eat them, the boss will perform a highly damaging AOE attack on Normal, or execute a TPK on Hard.

Final Boss: Elder Sage (Bearded Root)
HP: 160,196,000
Phases: 70%, 40%
Roles:
Far Vine [needs to be a mobile class with an extremely competent player] (FV),
Near Vine (NV)
Tank
The boss’s attacks all inflict the Corrosion debuff, which is a DoT that lasts for 30 seconds and stacks up to 10 times. At the start of each Phase, the boss will absorb all Corrosion debuffs which will damage any players with the debuff for 10,000 damage per stack of Corrosion. Almost everything is unblockable.
Pre 40% Rotation:
Claw Swipe(semicircle AoE) → Right Smash(unblockable 8x16 AoE) → 180-Degree Stomp → Corruption Wave
Notable Attacks:
180-Degree Stomp (Unblockable)

The 180-degree stomp covers the entire side of the arena that the tank is occupying, centered on the tank. The double version has both stomps in quick succession; as such, the tank will need to bait it away from the party, dodge it, then step back into place so that the second stomp is still on the same side. A Q->E for BM/BD tanks may be a good idea.
Corruption Wave(Unblockable)

A wide circular AoE that launches you if it hits, and hits in 3 waves. It erupts extremely far away first, then closer to the boss, then in a small circle around the boss.
Mechanic Phases
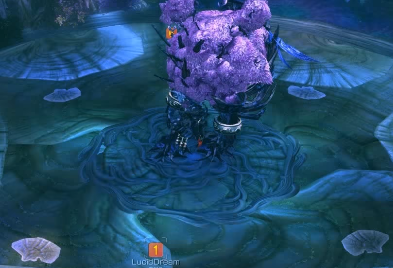
At the start of each phase, all players will have Tainted Seeds planted inside of them, giving the Tainted debuff for 15 seconds. At the end of this duration, the seeds will sprout and perma-root the player. At the same time, 4 green flowers will spawn on top of the shells pictured in the below image.
Touching a flower will root the player and weaken the taint; touching a second one will remove the Tainted debuff and apply a Vine buff. The boss will AoE pull all players to the center while trying to drain energy from these flowers after about 10 seconds after phase start; if any are left untouched, he will heal off absorbing the flowers. Players should ss or root break after touching the first flower to touch both flowers quickly.

The FV will take the two flowers on the northern side of the arena, at 10 and 2 o’clock.
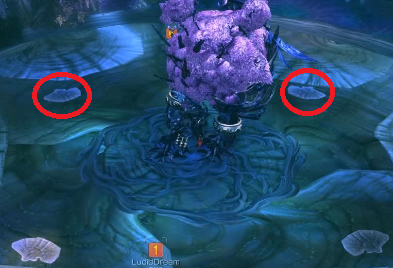
The NV will take the two remaining southern flowers at 7, then 4 o’clock. These two players will obtain the Vine buff, while everyone else will be rooted.
70%
After the boss tries to absorb the green flowers with the AoE pull, two purple flowers will spawn. They will randomly spawn, but one will spawn at the top half of the map for the FV, and one will spawn at the bottom half of the map for the NV.
The boss will then perform an instant kill AoE that covers the entire map except a cone shaped area, centered on one of the Vines.
The FV must position themselves farthest from the boss, in a line behind the purple flowers to direct the cone so that it encompasses the flower farther away from them. The NV should stand close to the boss, with the purple flower behind them, and be ready to ss/move onto the flower. When a player with Vine touches the purple flower, it will emit a vacuum pulse that will drag all players onto it, allowing the Viners to move the party around to prevent them from being killed by the AoE.
70%
The boss will target the FV, creating the cone on the opposite side of the map of the FV. The NV, who should be in this zone, will then step on the flower, pulling the party onto it and into the safe zone.

The FV, having been pulled out of position by this, needs to quickly relocate back towards the boss and wait near the purple flower they were originally standing behind. The boss will then fire off a second instant-kill AoE, with a safe zone at the original location of the FV. The FV then quickly relocates to their original flower and steps on it to pull everyone to safety.

After this, the boss will perform a triple room-wide, unblockable AoE that should be party iframed, after which the rotation returns to normal.
3-Hit AoE(Unblockable, Room-wide; use iframe or sheathe)

40%
Things get much harder here, and the FV will need to be ready to move quickly. All four shells will hold a purple flower instead of just two. As a result, there will be four pulls during this phase. The order of tapping flowers for the safe zone is NV->FV->NV->FV, but the FV is still in charge of directing the zones. This means that the FV will need to rapidly reposition after the second pull, so they should be a class that can relocate quickly, as they have two rapid relocations to make; one immediately after the first pull from the NV to prepare for tapping the flower for the second cone, and immediately after the second pull to reposition for directing the third cone as shown below.

After the 40% phase, the boss will perform several very dangerous attacks in rotation until he is killed. His new rotation:
Spreading Taint → Double 180-Degree Stomp → RoT → 3-Hit AoE
Spreading Taint (Unblockable)

The boss will rapidly spawn tons of small, circular, unblockable explosions. Just avoid the AoEs on the ground, nothing particularly special.
Ripple of Taint - Beckon to Darkness [RoT] (Unblockable, Instant Kill)

The boss will create an instant kill AoE across the entire field except for a conical slice, very similar to Raven King’s mechanic. The starting position is the area opposite of the tank’s current position. The boss will then hold up one hand as the AoE darkens; everyone needs to look at this hand. The safe area will RAPIDLY shift in the direction of the hand that was raised; note that the shift is relative to the map; if the boss raises his right hand, the safe area will shift right each tick, counterclockwise. It will shift three times. Each shift only gives you about 3 seconds to move before the next aoe triggers. The tank is not immune to this attack; if they stand in it, they will die, and so they’ll need to move with the rest of the party. After the fourth AoE trigger(third shift), there will be another room-wide unblockable 3-Hit AoE. Use a party protection skill to survive it; it is the same 3-Hit AoE as previously shown.
Dreamslayer, the author, extracted highlights from the video, but also added additional information, clarifying notes, rotations, and attack descriptions and gifs from the video. .
Original video can be found at the following link:
Hollow’s Heart is quite involved, and will require good party coordination and/or communication in order to clear. The mechanics are heavily reliant on a couple of players for each battle.
Boss 1: Jurupo (Enraged Branch)
HP: 105,734,000
Phases: 70%, 40%
Standard Rotation:
Pierce Claw → Triple Spin → Skyward Swipes → Downward Cleave(Unblockable) → Dark Decapitation (every 3 Downward Cleaves)
Roles:
Four markers, preferably ranged but any class can do. If not ranged, lowest dps melee should do it. One Tank, should stay in melee range for the fight.
Notable Attacks
Triple Spin(blockable)
The boss will ignite both of its claws with energy and perform a slow spin slice. It will then spin back the other way more quickly performing three slices at a faster pace. Block, iframe, evade,or SS back and wait it out. Do NOT party iframe any of its regular attacks.
Dark Decapitation(Unblockable, Potential CC cancel, Total Party Kill if failed on Hard)
After the boss performs three rotations and approaches a phase boundary, it will perform a roaring animation and generate a dark aura underneath itself. This dark aura grants a buff to the bossthat prevents CCs from being applied as long as the boss stands within it, and will root players if touched.
The boss then jumps to the farthest person, emitting an extremely fast-moving kd shockwave when landing, then makes another dark aura. He then charges back towards the first AoE, and his charge must be blocked before he reaches the first AoE but after he leaves the second one. If blocked, or if he reaches the first, he will attempt to wipe the party and must be CCed out of the attack.
If he reached the aura, he’ll be immune to CCs and thus will successfully wipe the party on Hard, or will require an iframe on Normal.
Generally, Marker 1 will lure the jump. After 40%, he will jump twice, once to the farthest person, then again to the farthest person from his new position.
Mechanic Phases
In each phase, the boss jumps to the center of the arena and marks the four farthest players, in order from farthest to nearest of the four. On 40%, it will also release two dark balls that must be blocked; if touched, they apply a root. After that, it will follow up with 5 rapid room-wide AoE shockwaves that can be jumped over. If hit, you will be knocked back. The boss will then perform a Decapitation, a room-length conal AoE centered on each marker, in order of the marks.
On Normal Mode, this can be iframed, but is an instant kill on Hard Mode. The marks need to be spread out at the four corners of the room so that the waves do not kill the party or other marks, and they have time to rotate away from the waves. The one being targeted for that particular wave is immune to the instant-death effect, but still needs to iframe the attack. Use the four shells on the ground near the boss to line up the four marks, and position appropriately according to the image below.
After the fourth cone, the boss will attempt to use a room-wide instant kill, Mass Decapitate. It must be CCed out of it to prevent party wiping, but the attack can be iframed on normal mode if necessary. However, the dark buff will prevent fast ccs, so wait for it to expire before ccing the boss. After this, the boss will perform a 4-hit knockback AoE wave which must be party protected/iframed. Sheath is the best option.
Boss 2: S. Spider
HP: 113,100,000
Phases: 80%, 40%
Roles:
Marker, Dealer
Boss 2 is the easiest of the three bosses. Watch out for poison stacks, don’t let them get too high, and you’ll be fine for most of the fight. The poison stacks can be cleansed, so bring techniques that have that capability. The mechanics for this battle are fairly straightforward.
Mechanic Phases
The boss will jump to the center of the room and zip to the ceiling and become untargetable. The Marker needs to stand directly under her as she is entering the ceiling, as she places a mark on the closest person to her after getting into position. A spider icon will appear above the head of the Marker if they’ve done it correctly.
Spider eggs will spawn at the corners of the map. Each egg has 67,860 HP and should be destroyed quickly by all other players. The boss will then spawn many spiderlings who will all chase after the Marker. One of the eggs, randomly chosen each time, will have a Little Bomb Spider (LBS) inside it. When killed, the LBS drops an orb which the Dealer needs to pick up. The boss will then grab the marker and attempt to instant kill them. The Dealer then throws the orb at the boss during this, which will free the Marker and cause the boss to fall from the ceiling. If the Marker dies before the boss attempts to eat them, the boss will perform a highly damaging AOE attack on Normal, or execute a TPK on Hard.
Final Boss: Elder Sage (Bearded Root)
HP: 160,196,000
Phases: 70%, 40%
Roles:
Far Vine [needs to be a mobile class with an extremely competent player] (FV),
Near Vine (NV)
Tank
The boss’s attacks all inflict the Corrosion debuff, which is a DoT that lasts for 30 seconds and stacks up to 10 times. At the start of each Phase, the boss will absorb all Corrosion debuffs which will damage any players with the debuff for 10,000 damage per stack of Corrosion. Almost everything is unblockable.
Pre 40% Rotation:
Claw Swipe(semicircle AoE) → Right Smash(unblockable 8x16 AoE) → 180-Degree Stomp → Corruption Wave
Notable Attacks:
180-Degree Stomp (Unblockable)
The 180-degree stomp covers the entire side of the arena that the tank is occupying, centered on the tank. The double version has both stomps in quick succession; as such, the tank will need to bait it away from the party, dodge it, then step back into place so that the second stomp is still on the same side. A Q->E for BM/BD tanks may be a good idea.
Corruption Wave(Unblockable)
A wide circular AoE that launches you if it hits, and hits in 3 waves. It erupts extremely far away first, then closer to the boss, then in a small circle around the boss.
Mechanic Phases
At the start of each phase, all players will have Tainted Seeds planted inside of them, giving the Tainted debuff for 15 seconds. At the end of this duration, the seeds will sprout and perma-root the player. At the same time, 4 green flowers will spawn on top of the shells pictured in the below image.
Touching a flower will root the player and weaken the taint; touching a second one will remove the Tainted debuff and apply a Vine buff. The boss will AoE pull all players to the center while trying to drain energy from these flowers after about 10 seconds after phase start; if any are left untouched, he will heal off absorbing the flowers. Players should ss or root break after touching the first flower to touch both flowers quickly.
The FV will take the two flowers on the northern side of the arena, at 10 and 2 o’clock.
The NV will take the two remaining southern flowers at 7, then 4 o’clock. These two players will obtain the Vine buff, while everyone else will be rooted.
70%
After the boss tries to absorb the green flowers with the AoE pull, two purple flowers will spawn. They will randomly spawn, but one will spawn at the top half of the map for the FV, and one will spawn at the bottom half of the map for the NV.
The boss will then perform an instant kill AoE that covers the entire map except a cone shaped area, centered on one of the Vines.
The FV must position themselves farthest from the boss, in a line behind the purple flowers to direct the cone so that it encompasses the flower farther away from them. The NV should stand close to the boss, with the purple flower behind them, and be ready to ss/move onto the flower. When a player with Vine touches the purple flower, it will emit a vacuum pulse that will drag all players onto it, allowing the Viners to move the party around to prevent them from being killed by the AoE.
70%
The boss will target the FV, creating the cone on the opposite side of the map of the FV. The NV, who should be in this zone, will then step on the flower, pulling the party onto it and into the safe zone.
The FV, having been pulled out of position by this, needs to quickly relocate back towards the boss and wait near the purple flower they were originally standing behind. The boss will then fire off a second instant-kill AoE, with a safe zone at the original location of the FV. The FV then quickly relocates to their original flower and steps on it to pull everyone to safety.
After this, the boss will perform a triple room-wide, unblockable AoE that should be party iframed, after which the rotation returns to normal.
3-Hit AoE(Unblockable, Room-wide; use iframe or sheathe)
40%
Things get much harder here, and the FV will need to be ready to move quickly. All four shells will hold a purple flower instead of just two. As a result, there will be four pulls during this phase. The order of tapping flowers for the safe zone is NV->FV->NV->FV, but the FV is still in charge of directing the zones. This means that the FV will need to rapidly reposition after the second pull, so they should be a class that can relocate quickly, as they have two rapid relocations to make; one immediately after the first pull from the NV to prepare for tapping the flower for the second cone, and immediately after the second pull to reposition for directing the third cone as shown below.
After the 40% phase, the boss will perform several very dangerous attacks in rotation until he is killed. His new rotation:
Spreading Taint → Double 180-Degree Stomp → RoT → 3-Hit AoE
Spreading Taint (Unblockable)
The boss will rapidly spawn tons of small, circular, unblockable explosions. Just avoid the AoEs on the ground, nothing particularly special.
Ripple of Taint - Beckon to Darkness [RoT] (Unblockable, Instant Kill)
The boss will create an instant kill AoE across the entire field except for a conical slice, very similar to Raven King’s mechanic. The starting position is the area opposite of the tank’s current position. The boss will then hold up one hand as the AoE darkens; everyone needs to look at this hand. The safe area will RAPIDLY shift in the direction of the hand that was raised; note that the shift is relative to the map; if the boss raises his right hand, the safe area will shift right each tick, counterclockwise. It will shift three times. Each shift only gives you about 3 seconds to move before the next aoe triggers. The tank is not immune to this attack; if they stand in it, they will die, and so they’ll need to move with the rest of the party. After the fourth AoE trigger(third shift), there will be another room-wide unblockable 3-Hit AoE. Use a party protection skill to survive it; it is the same 3-Hit AoE as previously shown.