Hey all!
I recently got back in to Blade & Soul to play with my boyfriend after I quit some years ago, and was looking for the program that I used to use; which happens to be the One Click Tool (despite actually being a minimum of five clicks, but you know, whatever.)
There are plenty of guides on how to make this work, including ones found here on this forum. I don't intend to steal any of the glory from them, as they all helped me figure out how to get it working, but personally I found them difficult to understand for a number of reasons (changing from guide to guide.) It took me quite a while to set up, seeming as most of the ones I could find were either incomplete, written in broken english, or just outright hard (for me) to understand due to vague descriptions and assumptions of familiarity with the program. Not to mention the 3 or 4 different reuploads of the tool itself that are all slightly different. I also see a lot of people asking for updated databases and such since they can't manage it themselves, as well as some exasperated admins that don't want to deal with such a large number of people that don't bother trying to fix something themselves before asking for help. So with this, I intend to write a complete, easy-to-read, easy-to-understand guide of how to install, use, and update the tool, and to document how to fix any errors that appear for myself and other users with the intent of being the ultimate one-stop-shop for this tool.
Everything written here will be for Windows 10 users since that's what I have on both my laptop and desktop, but it should be close enough that you can figure it out on Windows 7 or 8.
Things you will need to know:
Part One: Installing the One Click Tool
If you're on this website you've probably seen this post. It was enough for me to set it up, but not without a few hitches in my understanding, as well as half of the information you need not being in the origional post but instead in other users comments, so I'm gonna try to make it a bit easier to understand.
Now, this is cool and all, but the creator of this tool hasn't exactly updated it in a while. Luckily for you, I spent three days reading through four different guides, and troubleshooting all the problems that came up by reading the code because I couldn't find the answers on google (or this forum). This download of the tool is updated as of April 25th, 2019, client version 0.0.317.8110. In any further updates of the game, you will have to manually update the database yourself.
In the root directory of BladeSoulTool, there is a file named run.bat. This will be our workhorse in updating the database. Open the file in your prefered text editor and keep this file open, as we'll be editing the ACTION part quite a few times. In order, we will be doing:
build_preparer
icon_dumper
upk_preparer
upk_scanner
upk_parser
shooter
png_optimizer
And you're done! Now in theory you should now open the program and have a brand new, updated database, with all the new outfits somewhere in there! However, there are probably some issues I didn't cover in this guide, since I didn't personally encounter them. I'll try to answer everything I can with my limited knowledge on this tool and, more importantly, keep all of the information centralized to make it painfully easy for everyone else to find.
Part Three: Help!
Of course, with such a complex program comes its issues. I don't have much to add here at the moment, but I intend to keep this as updated as possible with the questions people ask as well as the answers either other users or myself give. This makes it easier for anyone else to quickly find what they're looking for should they encounter the same problem without having to search for it, so they don't have an excuse.
I recently got back in to Blade & Soul to play with my boyfriend after I quit some years ago, and was looking for the program that I used to use; which happens to be the One Click Tool (despite actually being a minimum of five clicks, but you know, whatever.)
There are plenty of guides on how to make this work, including ones found here on this forum. I don't intend to steal any of the glory from them, as they all helped me figure out how to get it working, but personally I found them difficult to understand for a number of reasons (changing from guide to guide.) It took me quite a while to set up, seeming as most of the ones I could find were either incomplete, written in broken english, or just outright hard (for me) to understand due to vague descriptions and assumptions of familiarity with the program. Not to mention the 3 or 4 different reuploads of the tool itself that are all slightly different. I also see a lot of people asking for updated databases and such since they can't manage it themselves, as well as some exasperated admins that don't want to deal with such a large number of people that don't bother trying to fix something themselves before asking for help. So with this, I intend to write a complete, easy-to-read, easy-to-understand guide of how to install, use, and update the tool, and to document how to fix any errors that appear for myself and other users with the intent of being the ultimate one-stop-shop for this tool.
Everything written here will be for Windows 10 users since that's what I have on both my laptop and desktop, but it should be close enough that you can figure it out on Windows 7 or 8.
Things you will need to know:
- System Type
- Is your computer running a 32-bit or 64-bit operating system?
- "Root"
- This is the base folder containing everything a program needs. For BladeSoulTool, this is the one that contains 'BladeSoulTool.bat', 'Gruntfile.js', and others.
- How to Read
- If you ask me a question that is already answered by reading this origional post, I will do nothing but tell you to read. I might quote the relevant information for you if you're particularly nice about asking.
Part One: Installing the One Click Tool
If you're on this website you've probably seen this post. It was enough for me to set it up, but not without a few hitches in my understanding, as well as half of the information you need not being in the origional post but instead in other users comments, so I'm gonna try to make it a bit easier to understand.
- Download the tool from here.
- Extract the tool (almost) anywhere on your pc. This path CAN NOT have any spaces in it. It will cause issues later. For this reason, my working path is the following 'Good Path'
Good Path: D:\Developer\BladeSoulTool\
Bad Path: C:\Program Files\BNS\Blade and Soul Tool\
Reason: Some of the code for updating the database is not quoted, meaning it does not understand that your full file path is one input, but instead breaks it apart at the spaces, which is not good. Especially when you find out only after the 36 hours it took to run that code, and you didn't actually get anything out of it. (Please kill me.)
- Download and install .NET Framework v2.0. I believe everyone on Windows 7 and higher should have this by default, but it doesn't hurt to reinstall just to make sure.
- In the BladeSoulTool root folder, navigate to /resources/nodejs/.
• If you are on a 64-bit system, install the one ending in '-x64.msi'
• If you are on a 32-bit system, install the one ending in '-x86.msi'
- Now in the same folder, run 'install.bat' to get the node.js components we need for the One Click Tool to work. If it outputs 'Command node not found, please install it first.' Then the installation either failed or you have to restart your PC (though this isn't usually needed.) If it installed correctly, you'll get a long list of files that the script is gathering for you and installing, so wait a few seconds for it to finish.
- Now we'll configure the settings. In the BladeSoulTool root folder, go to /config/ and open 'setting.json' in your preferred text editor (I use Notepad++). Here we will change the installation path for our game files. At the top of the file you'll find this:
Code:{ "path": { "game": "H:\\Games\\Blade and Soul\\BNS", "ncdata": "contents\\Local\\NCWEST\\data", "data": "contents\\Local\\NCWEST\\ENGLISH\\data", "tencent": "contents\\Local\\NCWEST\\ENGLISH\\CookedPC", "bns": "contents\\bns\\CookedPC" }, "version": "v2.0.7", "lang": "en_US",
Here, we will want to change "game": to the root folder of our game installation (The folder containing 'bin', 'bin64', 'contents', and 'version.ini'). Please notice that the forward slashes are all escaped, meaning there is another forward slash before it. This is required for it to work properly, so do that. Also, if you are not on the US server, you will probably also have to edit the "data": , "ncdata":, and "tencent": paths as well.
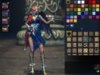
- Now, go back to the BladeSoulTool root folder and run 'BladeSoulTool.bat'. (This is what you'll be using to run the actual program.) It should open up without any errors! Now you can use the program by selecting an origin model (the costume you actually have) and a target model (what you want it to look like) and clicking "Replace from LEFT to RIGHT" at the top! Then just launch/restart your game and voila! Now you can be the fashion diva you always wanted to be.
Now, this is cool and all, but the creator of this tool hasn't exactly updated it in a while. Luckily for you, I spent three days reading through four different guides, and troubleshooting all the problems that came up by reading the code because I couldn't find the answers on google (or this forum). This download of the tool is updated as of April 25th, 2019, client version 0.0.317.8110. In any further updates of the game, you will have to manually update the database yourself.
In the root directory of BladeSoulTool, there is a file named run.bat. This will be our workhorse in updating the database. Open the file in your prefered text editor and keep this file open, as we'll be editing the ACTION part quite a few times. In order, we will be doing:
build_preparer
icon_dumper
upk_preparer
upk_scanner
upk_parser
shooter
png_optimizer
- [1s] Replace ACTION with build_preparer, then save and run the file.
This will get rid of all the old database files in order to prepare for the new one's we're about to get.
- [30m] Replace ACTION with icon_dumper, then save and run the file.
This will search all of the BNS game files for item icons, then convert them to a useable .PNG format.
Note: The second half of this command converts every file one by one (you'll see it slowly counting up), and can take up to two hours to complete. Because of that I downloaded a free trial of another program called tga2image. This program can batch convert all of the files in a much shorter time and, while it claims it adds a watermark to the images, I can't see it at all.
• Open the program and click "OK" to dismiss the trial notification
• Click on File > Add Input Files..., then click Add Input Folder... and navigate to BladeSoulTool\database\icon\tga\
• Click on File > Select Output Folder... and click on the "png" folder right above the "tga" folder.
• Then, click on the giant arrows to convert all of the files to useable PNGs. This should take a minute at most; a much, much faster conversion than the two hours it takes for icon_dumper.
Once all of the files are converted, move all of your icons from \database\icon\png\ to \database\icon\png-cps\.
- [1m] Navigate to your BNS folder and open \contents\Local\NCWEST\data\, then copy xml.dat and paste it your BNS tool directory under \resources\dedat\bin\, then run translate.bat. Once it finishes you will have a folder called xml.dat.files. Copy the contents of this folder into \resources\dedat\output\.
- [1m] Replace ACTION with upk_preparer, then save and run the file.
Once this finishes it will probably say process "dedat" exited with code: 0, this is fine. At this point it would use another program that doesn't work anymore (which is why you had to manually copy those files in the last step.)
- [2h] Replace ACTION with upk_scanner, then save and run the file.
- [45m] Replace ACTION with upk_parser, then save and run the file.
These steps scan all of your information and figures out what specific files contains which data, then writes it all down for the program to use later. These may take an hour or two to complete.
- [12h] Replace ACTION with shooter, then save and run the file.
Here comes the worst part. At this point, you'll want to not be doing anything at your PC in order for this to work properly, since it will now be opening every single costume, attachment, and weapon model and taking a screenshot of it. There are upwards of 15,000 files for this to go through, so you might as well go to bed (and sleep in a couple extra hours).
- [Optional] Replace ACTION with png_optimizer, then save and run the file.
- Now, in order for icons to work, you will want to copy files from your new database to the VS_GUI tmp. To do this open two file explorers; one in \database\, the other in \VS_GUI\BladeSoulTool\tmp\ and copy the following:
Code:\database\attach\pics\ goes into \VS_GUI\BladeSoulTool\tmp\attach\ \database\costume\pics\ goes into \VS_GUI\BladeSoulTool\tmp\costume\ \database\weapon\pics\ goes into \VS_GUI\BladeSoulTool\tmp\weapon\ \database\icon\png-cps\ goes into \VS_GUI\BladeSoulTool\tmp\icon\
And you're done! Now in theory you should now open the program and have a brand new, updated database, with all the new outfits somewhere in there! However, there are probably some issues I didn't cover in this guide, since I didn't personally encounter them. I'll try to answer everything I can with my limited knowledge on this tool and, more importantly, keep all of the information centralized to make it painfully easy for everyone else to find.
Part Three: Help!
Of course, with such a complex program comes its issues. I don't have much to add here at the moment, but I intend to keep this as updated as possible with the questions people ask as well as the answers either other users or myself give. This makes it easier for anyone else to quickly find what they're looking for should they encounter the same problem without having to search for it, so they don't have an excuse.
- Help! I followed the guide and the preview images work, but none of the icons do!
Please remember to follow the last part of step two, all the way through step six. Even if you think you've done it, do it again. Make sure all of your icons are in \database\icons\png-cps\ and, just to be sure, delete them from \database\icons\png\. (I don't know if this matters at all, but it worked when I did that, so might as well.) I had to run through this step three or four times following my own guide before it started working.
- Help! I changed a costume, but now other costumes I didn't change look all messed up!
This is an issue with how the game deals with recolours. Many costumes use the same mesh data and change the textures in order to have multiple different colours (For example, the Jiangshi Raiment and Pale Stalker Raiment). If you change one, it works, but now the other costume is using a different mesh with its old textures, which are not designed to work together. This is just an unfortunate side effect that, as far as I'm aware, you'll have to live with.
Last edited:
")